Release Date: Production 20 December 2017
Status: Released to Production
For detailed information on Aztec 3.7.3 - 3.8.4 please view a section below.
For more information any of the features introduced in this release click the title link to navigate to the new feature information.
Open Rate Discount - Zonal ID PM245
Head Office Configuration - Discounts
-
Open Theme Modelling | Estate Settings | Discounts tab
-
Select Add / Edit Discount
-
Select the Discount Type drop down list, choosing Open Rate
-
The Maximum % rate defaults to 100%. Set this level, the Maximum discount and the Minimum Spend Amount, as required
-
Configure any other settings as per previous discount settings
-
Click OK to save changes return to the Theme Modelling main menu
Head Office Configuration - Add button to Theme
The Open Rate Discount button needs to be added to the relevant theme, this can be found in the button picker under Other Lists | Apply Discounts
For detailed information on adding buttons to theme panels root or local panels click here or for shared / variation panels here.
Head Office Configuration - Send Changes to Sites
For the new settings made at Head Office to take effect at site, perform a communications job to the required sites.
For detailed information on running communications jobs click here.
Front of House Operation
When a product is rung up and the open rate button selected (from whichever panel it is placed on), the POS terminal prompts for a percentage value.
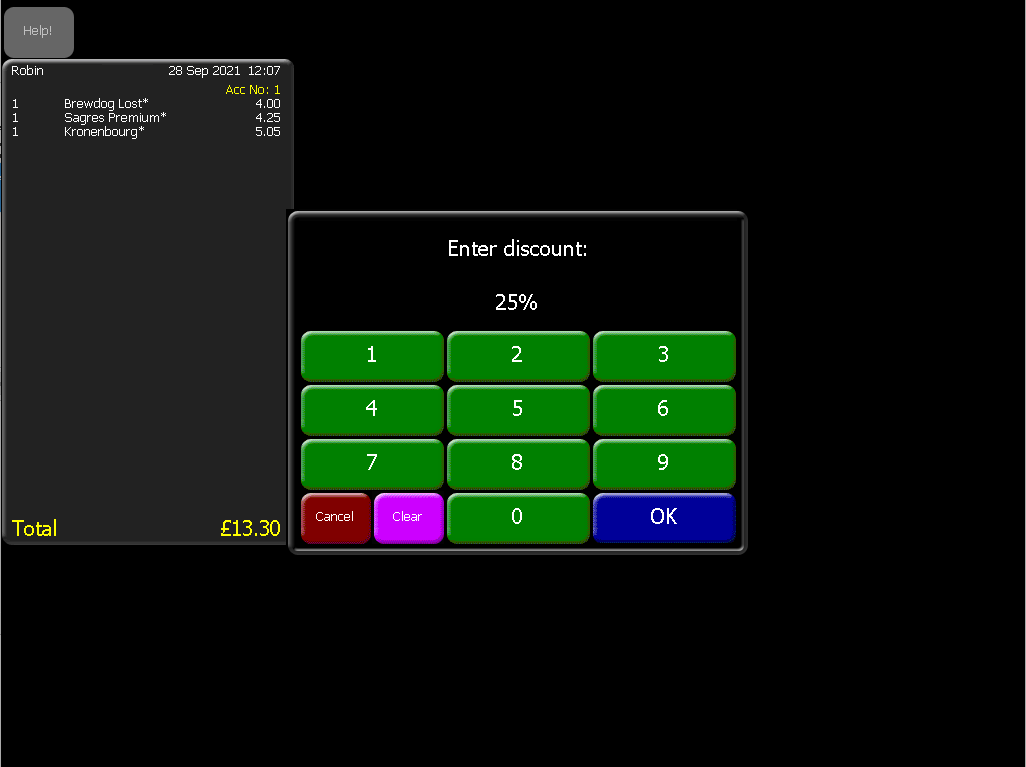
When the percentage value of the open rate discount is entered, click OK to show the order panel with the product rung up and the open rate discount applied:
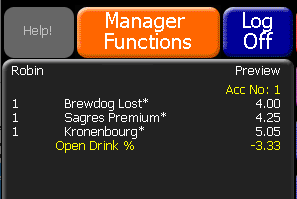
The value entered can be up to and including the Maximum % Rate defined at head office.
Multi-level Conversational Ordering - Zonal ID PM649
A good example would be where a baked potato is selected as a choice within a meal but there are multiple choices of toppings that can go on the potato and the customer can choose as many of these choices as they want. The customer can now choose one or many of the toppings and the new multi-level (nested) conversational ordering function can handle this.
When a min / max choice is included within another choice, it will now respect the min / max limits defined by the parent choice.
Choices with defaults cannot be included as a choice within a choice.
Due to the complexity of multi-level conversational ordering, this functionality must be enabled in Aztec Base Data before it can be used in Aztec Product Modelling. Before doing this and changing your data, please upgrade all sites to a supported Aztec version, and ensure that iOrder or iServe users are on a compatible version.
Head Office Configuration - Enabling Feature
-
Open Aztec Base Data | Estate Settings | Estate Details tab
When Multi-level Conversational Ordering is enabled (in step 2 below) and saved, it cannot be undone.
Zonal recommends that after enabling multi-level (nested) conversational ordering, only one product is changed then all system areas checked (i.e. POS, iServe, iOrder, product export) before any other items are updated. -
Within the Estate Products tab, select the Nested conversational ordering check box for the estate or parts of the estate as required
-
Select Yes when prompted that this new setting cannot be undone
-
Select Save to update changes
Aztec XML Import
New product constraints have been introduced. Any new products, or changes to existing products that would result in these new constraints being violated will be rejected by the system and an appropriate message displayed to the user.
-
On an estate where multi-level conversational ordering has been enabled, a choice may not directly contain a choice with default ingredients
-
On an estate where multi-level conversational ordering has been enabled, the following previous product setup constraints are no longer be enforced:
-
A min-max choice cannot contain a min-max choice
-
A min-max choice can only be added at the top level
-
-
Regardless of whether multi-level conversational ordering is enabled or not, an open-priced product cannot be a choice default
For more detailed information, refer to the release specific Schema documentation for the Aztec XML Import.
Aztec Product Modelling
New product constraints have been introduced of which Aztec Product Modelling users must be aware:
-
A default product can be a standard line, an instruction or a recipe that has within it no choices. It cannot be a choice or a recipe with choices
-
A choice cannot directly contain a choice with default products as the user does not see the default and if removed, there would be insufficient indication to the kitchen
-
The system prevents choices that are children of choices from being set with defaults as their removal would cause confusion. In this scenario, choices made at the sub-level contribute to the parent choices selection count. If defaults are required, the recipe should be changed to place the sub-choice at the same level as the 'parent' choice
-
Open-priced products can be at any level but they cannot be a default and 'Extra' is not allowed
-
Where choices have different prices and are used in a recipe where some are inclusive (at their supplementary price), and some are at the standard price, the cheapest priced item is charged
-
On an estate where multi-level conversational ordering has been enabled:
-
a choice may not directly contain a choice with default ingredients
-
a choice containing a default ingredient may not be added to a choice
-
-
On an estate where multi-level conversational ordering has been enabled, the following previous product setup constraints are now no longer enforced:
-
when validating choice selections, prevent enabling of min-max choices if the product is the child of another min-max choice or if the product contains a min-max choice as a child
-
when adding an ingredient, a min-max choice cannot be added to a minmax choice, can only be added at the top level and cannot be added as in ingredient
-
-
Regardless of whether multi-level conversational ordering is enabled or not, an open-priced product cannot be a choice default
Front of House Operations
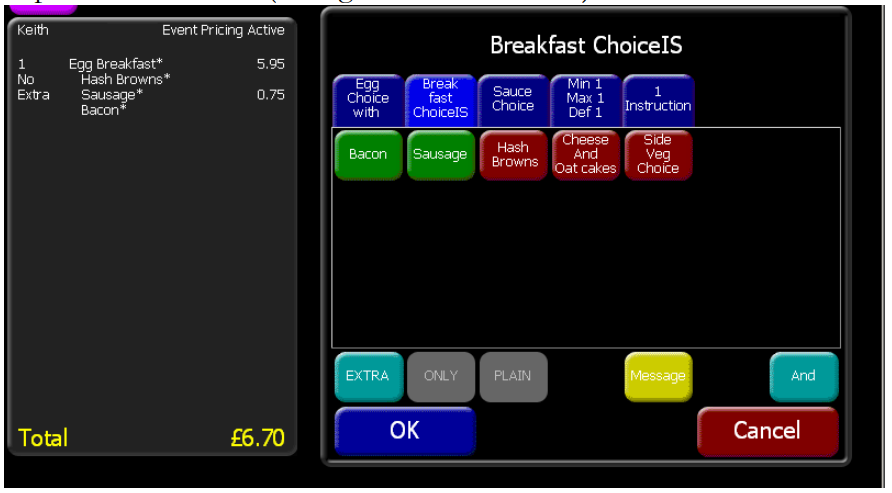
When conversational is enabled for a site and a POS user selects a conversational choice within a choice, they are now prompted with an additional choice selection dialog that opens on top of the previous existing dialog. Note the following actions:
-
In sub choices, or deeper sub choice levels, the OK button takes the user back to the next level up
-
In sub choice, or deeper sub choice levels, the Cancel button removes all choices at this level and takes the user back to the next level up
-
If a user goes back to a previously selected choice (before the recipe / order had been completed and rung up), the user is taken to the relevant sub
choice dialog with the previously selected choices in green, to enable the deselection or addition of more choices
-
Editing a choice after an item has been rung up takes the user to the relevant sub choice dialog where they can deselect an existing choice or add more
Auto advance, extra / only / plain, inclusive options and min / max choices are all unchanged from previous behaviour.
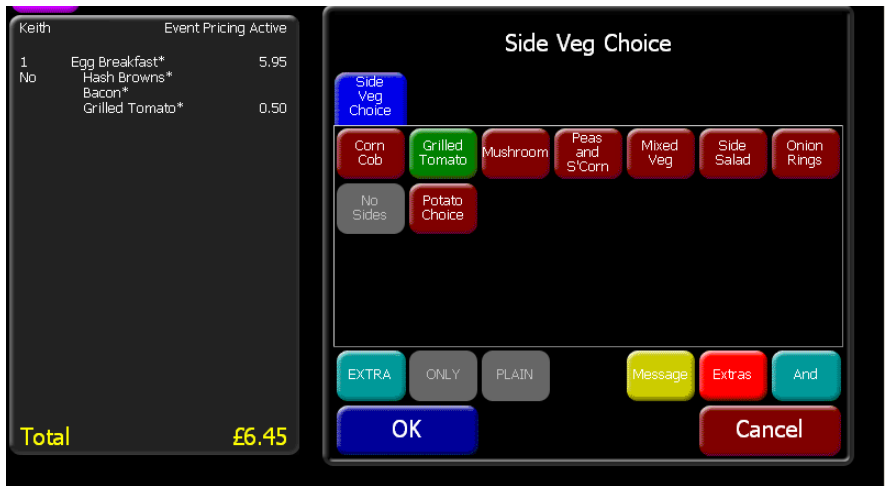
Reselection of an already selected child choice now displays the previous choices on the dialog rather than removing the existing choice. For example if Corn on the Cob had previously been selected as a side veg (as in the example below):

Pressing the ‘Side veg choice’ button displays the choice dialog
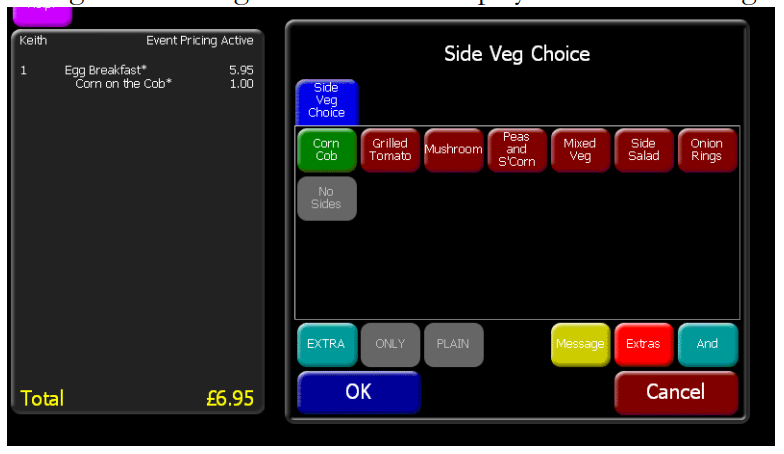
At this point the choices can be edited. To remove them all, press Cancel. These sub-choices count towards the parent’s overall count of choices. In the example used here, this will allow 2 ‘other sides’ to be chosen. For example this choice is limited to 7 children including 2 default items from the parent choice
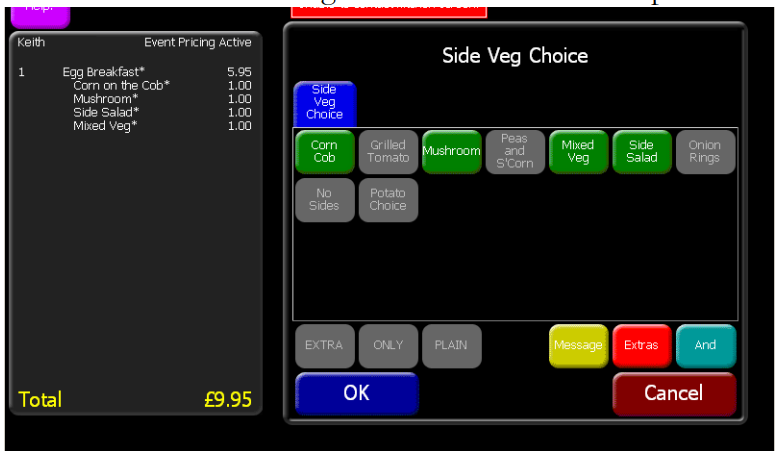
Choices can be placed within sub-choices, for example selecting the ‘Potato choice’ button displays the example below:
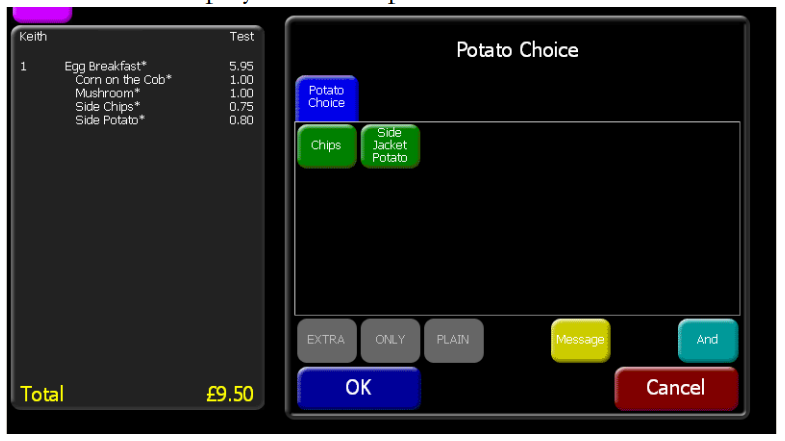
Choices on this dialog are also counted towards the grand parent and so the ‘EXTRA’ button is NOGOed with ‘Maximum choices already selected’.
Where choices have different prices and are used in a recipe where some are at the supplementary price, and some are at the standard price (number of choices > Choices Using Supplement Price) the cheapest priced item will be charged to favour the customer. In the following example:
| Choice | Supplement Price | Standard Price |
|---|---|---|
| Bacon | 0 | 0.75 |
| Corn on the Cob | 0 | 1.00 |
| Grilled Tomatoes | 0 | 0.50 |
| Sausages | 0.01 | 0.75 |
In a recipe with Number Of Choices = Choices Using Supplement Price -1:
-
If Bacon is selected, its supplementary price is used
-
If I then add Corn On the Cob, the Corn On the Cob supplementary price is used and Bacon is repriced as standard
-
If instead I then add Grilled Tomatoes, Grilled Tomatoes standard price is used
If I then add extra Bacon, Bacon standard price is used.
If I start again, and again with a recipe with Number Of Choices = Choices Using Supplement Price -1:
-
If Sausages is selected, its supplementary price is used
-
If I then add Bacon, the Bacon supplementary price is used and Sausages is repriced as standard (saving the customer 0.74)
In ‘Extra’ mode, open priced products are NOGOed with the message “Product has open price”.
The following rules are exactly as previous versions:
-
If ANDing a recipe onto a recipe, these remain in the conversational ordering dialog
-
If ANDing a simple product onto a recipe, these are not left in the conversational ordering dialog so that multiple ‘extra’ products can be easily chosen from an ‘Auto-And’ panel
-
If a product is selected and then tabs are switched before ANDing, the system will return to last clicked tab
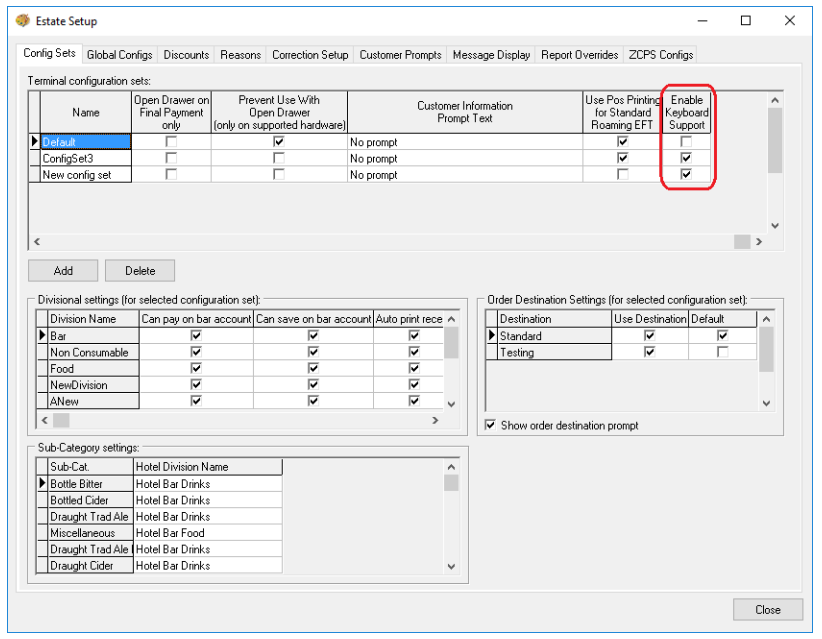
Enable Keyboard Wedge Support on Aztec POS - Zonal ID PM782
A new Aztec configuration has been added at Head Office to enable keyboard and mouse support on Z500 series POS terminals.
-
Open Aztec Theme Modelling | Estate Setup | Config Sets tab
-
For each relevant Config Set, select the Enable Keyboard Support check box
Head Office Configuration - Send Changes to Sites
For the new settings made at Head Office to take effect at site, perform a communications job to the required sites.
For detailed information on running communications jobs click here.
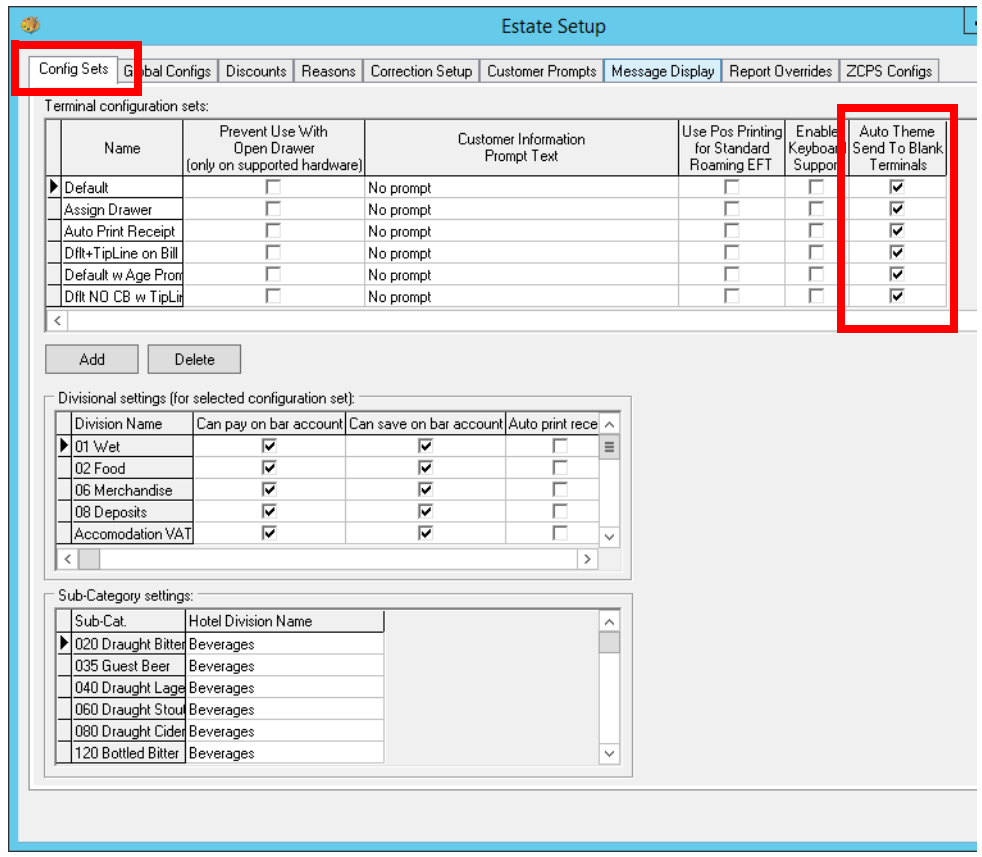
Auto Theme Send to PC-based Terminals - Zonal ID PM783
The installation of brand new POS at site will result in a new theme generation for all tills, and a replacement of an existing till will result in a resend of the previously generated theme for that terminal.
The Auto Theme Send to Blank Terminals setting is enabled in the Estate Setup window in Theme Modelling on a per config set basis. When it is enabled for the config set to which a terminal belongs, a theme send will be triggered to that terminal if no theme is detected when the audit reader checks that terminal.
This check happens as part of the standard audit reader loop, so each terminal will be checked regularly (dependent on the audit reader interval) to see if a theme exists.
If the theme is not sent to the till successfully, a Things To Do item will be displayed at Site and at Head Office until a successful theme send is done.
Functional Description
When Aztec detects a newly installed POS, i.e. one that does not have a model and has never received a theme before, a Send To POS is instigated from Aztec Theme Modelling. This is the equivalent of a ‘Send All’ from Aztec Theme Modelling (which generates the POS XML).
All POS terminals on site will be updated with the new XML. Note that if a manager is holding off doing a Send to POS to update tills because of price changes, the tills will be updated anyway as part of this automated update.
The theme send is not visible from the Back of House PC when it executes as this has been designed as a background application.
A Send To POS initiated from Head Office as part of a comms job will always take priority over the automatic Send To POS.
When Aztec detects that a till does not have a model but it has been generated previously (following a till swapout/replacement), this terminal will have its last known theme resent to the terminal. If no such theme exists, then a new theme will be generated and sent to the terminal.
-
Open Aztec Theme Modelling | Estate Setup | Config Sets tab
-
For each relevant Config Set, select the Auto Theme Send To Blank terminals check-box
Head Office Configuration - Send Changes to Sites
For the new settings made at Head Office to take effect at site, perform a communications job to the required sites.
For detailed information on running communications jobs click here.
Z522-Gen2.0 Graphical Display - Zonal ID PM804
No additional or specific Aztec configuration changes are needed to accommodate the new display option.
All existing POS font sizing, screen formatting and image options are supported with no change to Aztec.
Images must be in the format .bmp with no more than 8-bit colour depth.
Scrolling messages of up to 228 characters are supported.
Improved Filters on Site Products - Zonal ID PM805
A new check-box has been added to the Site Products window to allow the list of products to be limited to only products available for sale on a terminal on the site. This is enabled by default, but can be disabled by the user so that they can see all products from within the allowed categories (as per previous behaviour).
A Please Wait dialog may also be displayed while the Site Products window is loading.
When the check-box is ticked, the only products displayed are those included for sale on a panel that is within a Theme Panel Design currently selected for a terminal on the site in question.
If the check-box is disabled (unticked), then all products that are within the Theme selected for the site will be shown, whether they are currently sell-able from a terminal on this site or not.
The new filter works in combination with the existing Subcategory filter and Show Only Changed Products filter, in that only the products that meet requirements of all of the enabled filters will be shown.
Apply Security to Table Moves & Merges - Zonal ID PM832
Head Office Configuration - Enable Security
In the Staff & Security module at Head Office (in the Assign Permissions screen), four new Front of House role permissions are now available: Account Move, Account Merge, Table Move and Table Merge. These permissions are enabled for all Front of House roles by default.

Front of House Operations
When a user without the appropriate permission attempts to move or merge a table, the 'Yes' button on the 'move' or 'merge' confirmation will be padlocked (as shown in the example below):
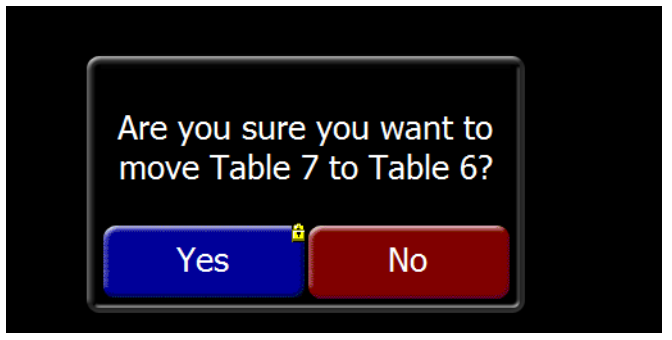
If a user does not have the necessary privileges, selecting the Yes option will require that an authorised user identifies on the till (for example, the manager).
Pennies Charity Donations - Zonal ID PM833
On the POS, items are rung up for payment as normal and when card payment is selected and the card is entered into the PED, any configured cash back and gratuity prompts appear before the donation prompt is displayed on the PED.
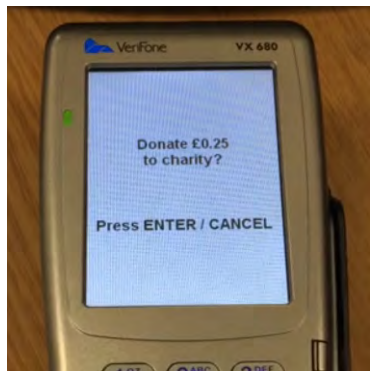
Donations are recorded in the POS terminal's audit trail and picked up by the audit reader which records it as the sale of a 'donation product'. The donation amounts are displayed in all ZBS and EPoS reports that show sales figures. The donation amount is also added to bills / receipts / checks:
For a comprehensive guide to setup and operation of the Pennies Charity Donation feature, please refer to Pennies Set Up and Usage Guide.
New Credentials for Fourth Product Import - Zonal ID PM835
This enhancement enables a second set of credentials to be defined so that both imports can be run in parallel without the URL needing to be shared between processes.
Users of the Fourth Product Import must ensure that after upgrade to Aztec 3.8, the additional set of dedicated Fourth Product Service credentials are entered in Aztec Base Data as described in the following section. Fourth Product Import will not work correctly in Aztec 3.8 until this step is carried out
Head Office Configuration
A new section has been added to Aztec Base Data | Application Settings | External Import Details (Head Office and Single Site Master).
This will allow the user to enter the credentials that will allow the Fourth Product Import to connect to a dedicated Fourth Product Service.
The previous ‘Fourth Service Connection Settings’ section has been renamed to ‘Fourth Service Connection Employee Section’ and on upgrade, the existing Fourth Employee Service settings will remain unchanged.
The new section is named ‘Fourth Service Connection Product Settings’ and on upgrade, these settings will be blank.
Ensure all necessary connection settings are entered and tested successfully, then saved.
Head Office Configuration - Send Changes to Sites
For the new settings made at Head Office to take effect at site, perform a communications job to the required sites.
For detailed information on running communications jobs click here.
Apply Security to Account following Bill Print - Zonal ID PM841
This allows Head Office to make till functionality available to team members (such as the application of single use vouchers) up to the point at which a bill has been printed on an account, then secure the button actions (including single use voucher) once a bill has been printed on an account. A manager’s authorisation is required.
Also introduced by Aztec 3.8.4 is a new enhancement that allows this security to be unlocked.
Head Office Configuration - Enabling Feature
Conditional security following bill print is configured in Aztec Theme Modelling on a per button basis (using the button security screen). This conditional security is not enabled by default.
If conditional security is not required then any role-based security specified by the user is treated as being ‘default’ security and is applicable both before and after the first bill print on the account, i.e. behaviour as in previous versions.
If the Head Office user chooses to use conditional security, then ‘default’ security indicates the role security applicable to the button, prior to the printing of the first bill print, and ‘after the first bill print’ security indicates the role security that becomes effective after the first bill has been printed on the account.
Conditional security can also be applied on a time period basis:
Conditional security is available for application to static panel security but is not available for site panel button security.
Increase Choices from 24 to up to 80 - Zonal ID PM863
being increased. A good example of this is pizza toppings.
If the number of options used is less than or equal to 25, the panel size and location will remain as they were previously. Estates that do not use choices with more than 25 options will see no difference in their choice panels.
Aztec Product Modelling & Aztec Import
Aztec Product Modelling and Aztec XML Import have been enhanced to allow up to 80 options on choice (previously limited to 24).
To help with managing larger lists of choice options within Aztec Product Modelling, a row number column has been added to the grid on the Portions tab. This row number is also displayed on the Portions tab of Standard Lines and Recipes.

Front of House Operations - POS Screens
New screen layouts have been introduced to handle the conversational ordering enhancements and increased choices. The POS system now automatically selects the most appropriate layout to display the recipe’s maximum number of choices. For example, if the recipe has a maximum of 63 choices the 64 choice template will be used.
Enable Keyboard Support on Z500 Series POS - Zonal ID PM867
The Z500 series POS terminals now support keyboard and mouse operation.
Virtual EPoS Server and EPoS Software on Same Device - Zonal ID PM870
Zonal suggest that a Windows Surface Pro 3 (and above) device is capable of performing all necessary POS and site management functions and recommend that if this device is not used, a minimum spec should be:
-
4GB RAM
-
120GB SSD Hard Drive
-
Windows 10 (64 bit)
-
Entry level i5 processor
On login to the device, the POS application opens in full screen. Alt+Tab switches to the Aztec Management System (back of house software).
Only a single instance of the POS application can be active on the device at any one time. Switching users is restricted and this will only be offered on Windows Professional OS (not Server). For a user switch to happen, the POS application for the existing user must be closed and restarted for the new user.
This type of system can be used as in Single Site Master or Site configuration and is known as AzOne, where the Virtual EPoS Server, back of house software and EPoS application are all installed. This can only be on Windows 10 Touchscreen PCs.
EPoS printing for the AzOne system is handled by compatible IP printers.
Operate Cash Drawers from IP Printers - Zonal ID PM871
This new feature is available only for the following IP printer types:
-
Orient BTP-R580II (IP)
-
Orient BTP-R580II (Pre-set Logo, IP)
-
Orient BTP-M300 (IP)
Head Office Configuration - Printer Setup
-
Open Aztec Theme Modelling | Site Setup | Devices tab
-
Select the required IP printer you wish to enable cash drawer firing, check 'Has Cash Drawer'
-
Click OK to save changes
It is not be possible to move an Orient IP Printer with an attached cash drawer to a server or to a terminal that already has an Orient IP Printer with a cash drawer. The system restricts this by not including the server or terminal in the Move to list for the Orient IP Printer
Orient IP Printers with cash drawers attached are available for sharing with other terminals.
Increase Limit on POS allowed with Virtual Server - Zonal ID PM872
Increasing the number of POS on a virtual server is recommended on only higher spec PCs
Previous Functionality
Site Setup in Aztec Theme Modelling allows the addition of new EPoS Servers. When a new server was defined, a check was made to see if the IP address specified for the Server was the same as the “Terminal Reports IP Address” value in the Printing tab. If they matched, the server was then classed as “Virtual”. At this point updating the Terminal Reports IP Address value automatically updated the IP address of the virtual terminal and the Add Peripheral option became disabled. As soon as the terminals had been added to the Virtual Server, the Add Terminal button also became disabled.
System Configuration
The limit is now configurable between a minimum of three and a maximum of 30 and can be applied as a global limit to specific sites and also an overriding site limit (per site) as required. Please contact your Zonal representative if the POS limit needs adjusted.
New Terminal Types - AzOne & AzTab - Zonal ID PM873
Configuration
These new devices are shown in the Hardware Type drop-down list in the Add Site Terminal Configuration screen.
These devices will prompt for standalone mode if connectivity to the comms server is lost, and a user will not be stopped from starting a stock if AzTab devices are offline.
Operations - Stocks
Whenever a new stock is started, Aztec Stocks checks if there are any AzTabs on the site that are late compared to the normal POS terminals. If the AzTabs being late would lead to the Stock's last complete audited Business Date (which defines the maximum allowable End Date for the new Stock) to be different than if only normal POS terminals were present, then the Stocks user is asked if they want to disregard AzTabs when it comes to what Last Audit Date Time to consider:
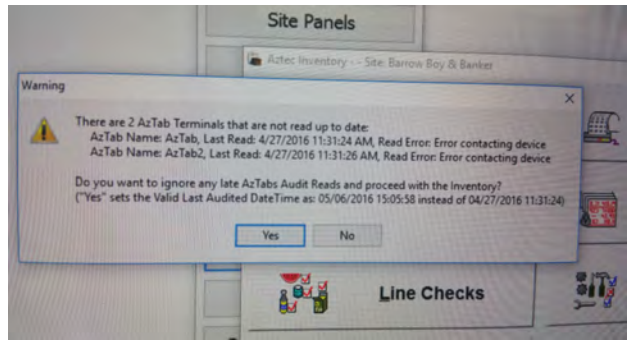
If Yes is selected, the Stock will proceed as if the only Last Audit Read Date Time figures that matter are the ones of normal POS terminals.
If you select No, then the stock can still be started but it will take the AzTab last read date and time in to account and set the stock dates accordingly.
Increase Number of Portions - Zonal ID PM874
In accordance with this enhancement, the Audit Transaction report, Detailed Transaction report and Recipe Make-up report have all been updated to handle the additional portions as they are used.
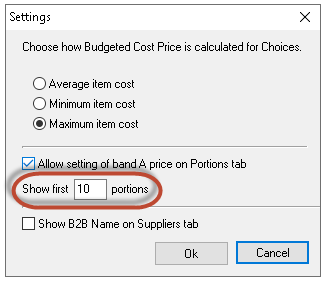
So that 20 portions are not shown in Aztec Product Modelling unnecessarily, a new setting called Show first X portions is added to the Settings dialog (accessed via the Settings button on the bottom left of the main window):
This setting defaults to 10 portions initially, but can be changed up to a maximum of 20 (and a minimum of 1) if set to 1, only the Standard portion will be displayed:
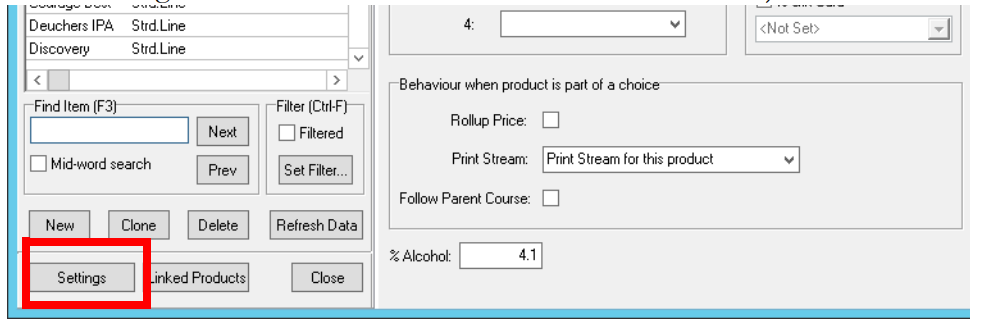
From within Aztec Product Modelling, you can also select which portion types (e.g. Half, Double, Thin Crust) are displayed on the Portions tab. A new button called Portions… (with an associated tick box) is added to the Portions tab page:
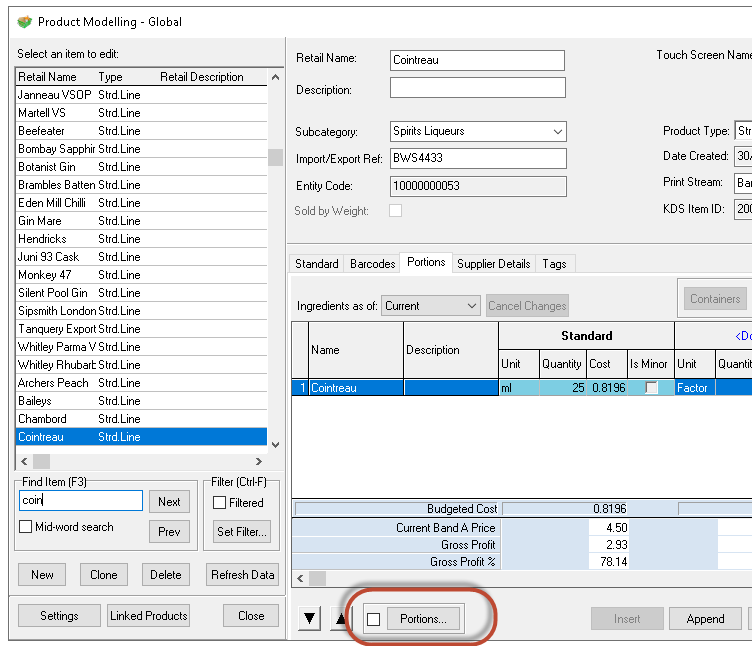
Pressing the Portions button displays a list of all portion types currently in use by at least one product with a tick box next to each. Initially all are ticked indicating all are displayed.
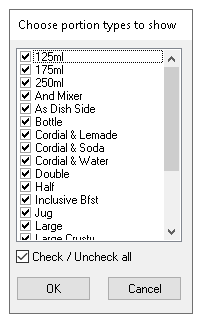
After ensuring only the desired portions are selected, for example Shandy and Top, and selecting OK.
The portions grid will be displayed showing portions of these types.
The dialog remembers its settings during Product Modelling sessions (unless Cancel was selected after making any changes). The state of the tick box and the Choose portion types to show dialog is preserved when navigating to different products. If portion filtering is currently applied the portions grid will continue to show only the selected portion types as the user navigates from product to product.
The tick box next to the “Portions…” button will be ticked to show that portions are currently being filtered.
Selecting the Portions check box (when unticked) launches the Choose portion types to show dialog.
Selecting when ticked will disable any filters that are currently being applied and the portions grid will change to show all portion types, including the empty ones. The tick box will clear indicating no filter is applied.
Allow Kitchen iQ to Serve a Delayed Order on the POS Terminal - Zonal ID PM878
On the POS terminal, a delayed order must be served. For a site that uses Kitchen iQ, a delayed order would only be bumped from the kitchen when it was ready and also need to be served on the POS terminal.
This enhancement supports a change in Kitchen iQ v3.6 to allow the action of bumping the order out of the kitchen to also serve the delayed order on the POS terminal.
The enhancement does not affect the Aztec POS.
Allow automatic Ownership Transfer for Unattended User Accounts - Zonal ID PM879
The system has been changed to enable configuration that unattended users are not set as account owner on account creation, so that when a non-unattended user picks up the account they automatically become the account owner.
An unattended user is defined as the user record associated with the ‘remote ordering terminals’ in Aztec Base Data | Sales Area Settings | MOA.
This enhancement does not apply to any application or third party which supplies an employee ID in their remote calls. Only iOrder operations, which do not provide an employee ID, will be affected by this change.
Head Office Configuration
Within Aztec Base Data | Estate Structure| Site Settings| Mobile Ordering, a new check box called Remote user will be owner has been added. This setting can be applied by multi-selecting sites as required.
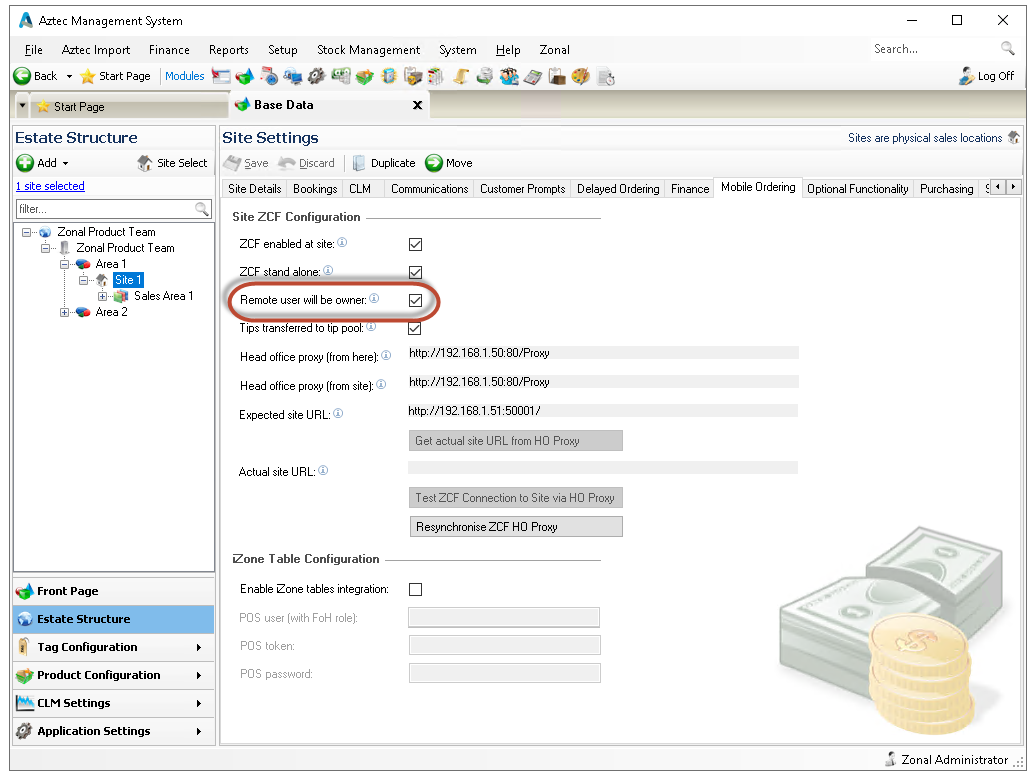
When checked, the remote ordering user, also known as the ‘unattended user’ for remote ordering terminals, will be the account owner. If not checked, the first POS user to access the account will become the account owner. This could be any POS user defined in Aztec Staff & Security, regardless of whether it is a person or the employee ID provided by another application or third party.
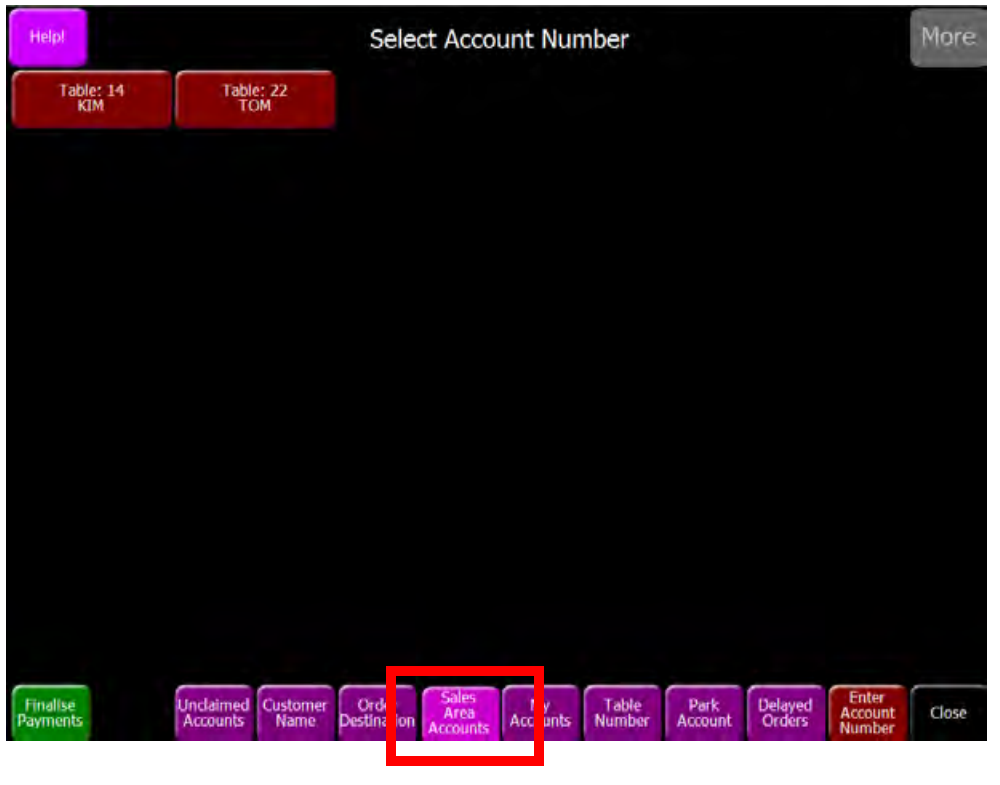
It is advisable to create a sales area specifically for mobile ordering within a site. This enables POS users to view all accounts/checks placed by iOrder/ unattended user. To do this:
-
Open Aztec Base Data | Estate Structure | Site Settings
-
Click the Add button and select New Sales Area
-
With the new sales area selected in the tree, open the Mobile Ordering tab
-
Ensure the Enabled check-box is selected. Click Save
Front of House Operations
In the example POS screen below, the select account screen opens with the filters initialised to a specific sales area and these do not include mobile ordering accounts / accounts without any owner, as they are within a different sales area. Had they been rung up in this sales area, they would be visible:
When the Unclaimed Accounts filter button is pressed, only accounts placed by an unattended user (i.e. currently without any owner) are now included in the list:
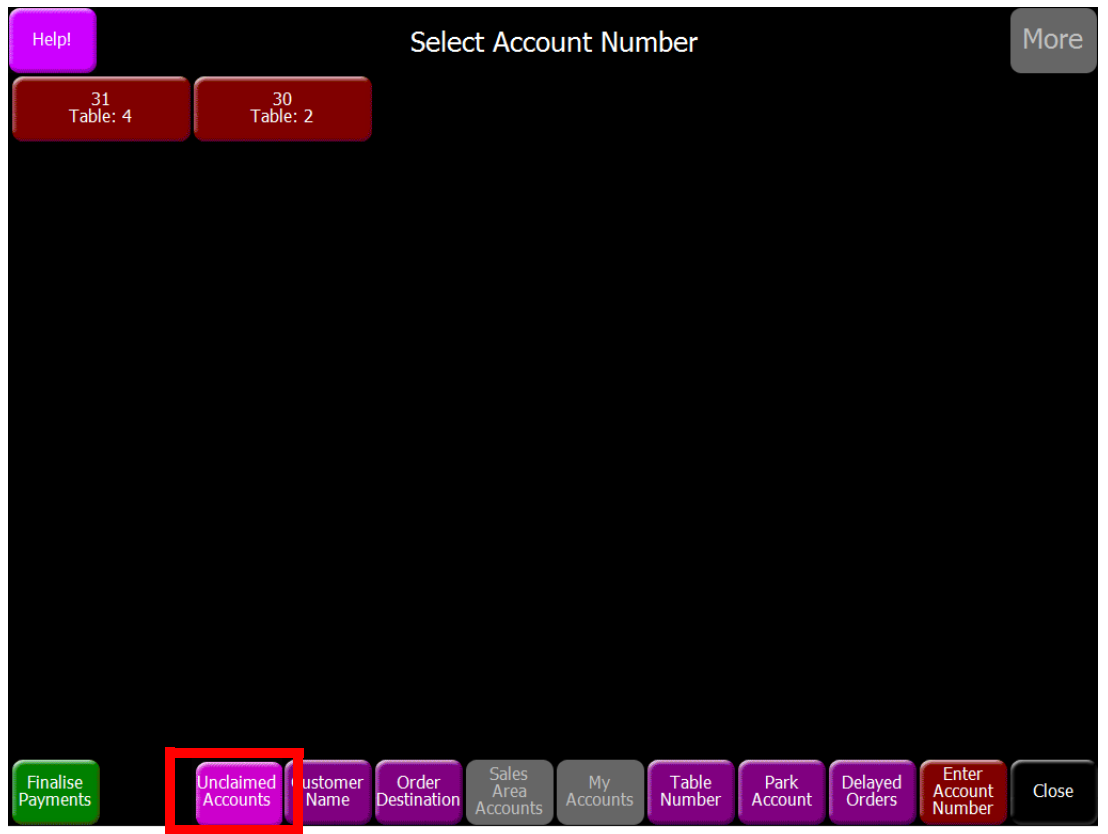
If one of the above accounts is picked up, the POS user will become the owner (if the system is configured as described on page 55). This account will then not display on the unclaimed account screen as it now has a POS user as the owner.
If the Unclaimed Accounts filter button is selected as in the example below, the My Accounts and Sales Area filter buttons become greyed out as they no longer apply. If either of the greyed out buttons are pressed, the POS displays the conflict message.
Accounts without any owner are always included in the recall account, drive thru, and preview pending lists and can also be picked up from a table plan:
The ‘bulk transfer of ownership’ button is always greyed out for an unattended user account and if selected displays the message "Current account has no owner".
Restrict Behaviour when Carrying Out a Stock - Zonal ID PM880
Head Office Configuration
New check boxes are added to the Threads Configuration screen.
-
The two ‘Disallow change of Nominal Prices…’ check boxes are only enabled if ‘Allow Setting of Nominal Price…’ check box is selected. Operation described in Nominal Price options
-
The check box that sets hiding of the auto fill button is only enabled if ‘Blind Stock…’ check-box is NOT selected. Operation described in Blind stock options
-
The 'fixed weekly stock' function is turned on using the drop down list highlighted at the bottom of the screen. Operation described in Fixed day of week for stock end date
Nominal Price Options
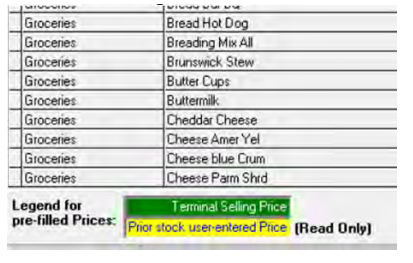
The 'Set Nominal Prices for items without one' screen varies depending on the two check boxes (above) that were set per Thread at head office. Either one, both or none of the 2 types of pre-filled Nominal Prices can be non-editable by the user. The visual indicator, in the form of '(Read Only)' labels, is displayed if one of the pre-filled prices types is non-editable.
The example image below shows both fields non-editable:
The example image below shows that the user can freely edit Nominal Prices derived from Terminal Selling Prices (also known as Tariff Prices), but the other type is still protected (Read Only).
Blind Stock Options
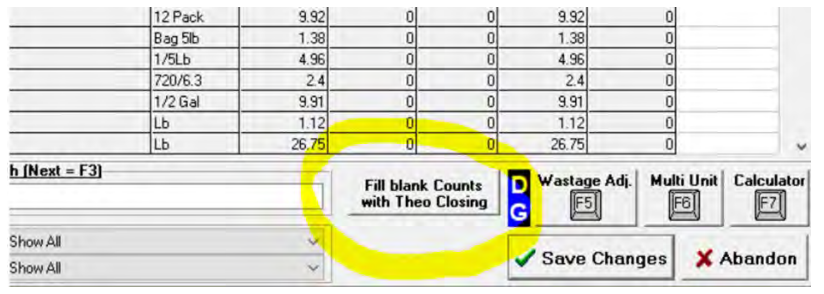
The example image below shows the button that would be hidden on the Audit screen if the setting ‘Hide button “Fill blank Counts with Theo Closing”’ (highlighted above) is turned ON.
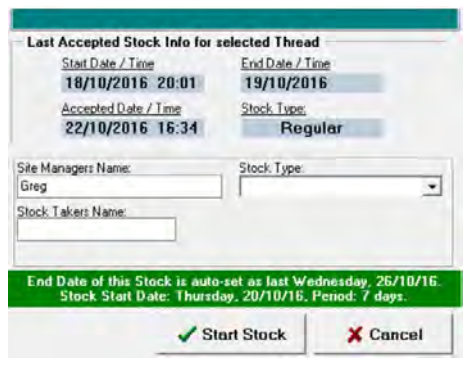
Fixed Day of Week for Stock End Date
Subordinate Threads have this drop-down option disabled. They automatically take this setting from the Master Thread. When this setting is changed for a Master Thread (either turning it ON/OFF or just changing the day-of-week) the system will also update the Subordinate Thread.
The new feature is visible in the ‘New Stock Setup – Step 1’ screen. Threads having this feature turned ON will get an extra information label just above the buttons at the bottom of the screen. This label informs the user that the End Date is set automatically, what the thread is, the Start Date and Period in days. This is because the system does not display the normal ‘Step 2’ screen as the user is not be allowed to choose an End Date or End Time. In this case, the button normally labelled ‘OK’ read ‘Start Stock’ instead.
For example, presuming this setting is ON and set to Wednesday. There is a Stock that ends on 17/10/2016, which is a Monday.
The next possible stock could have an End Date of 19 October (the next Wednesday). Note that this stock is NOT a weekly stock yet as it’s the first time a stock is done after the Thread has been set to use fixed day-of-week End Dates.
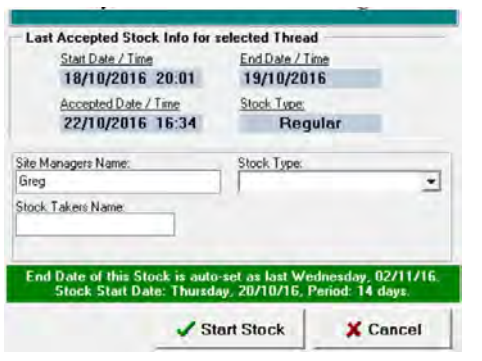
If the user tries to do a New Stock on 21 October (a Friday):
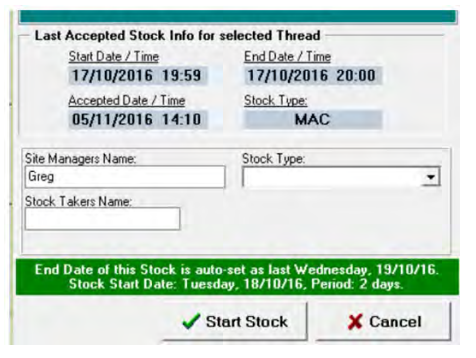
..the Stock is done and Accepted.
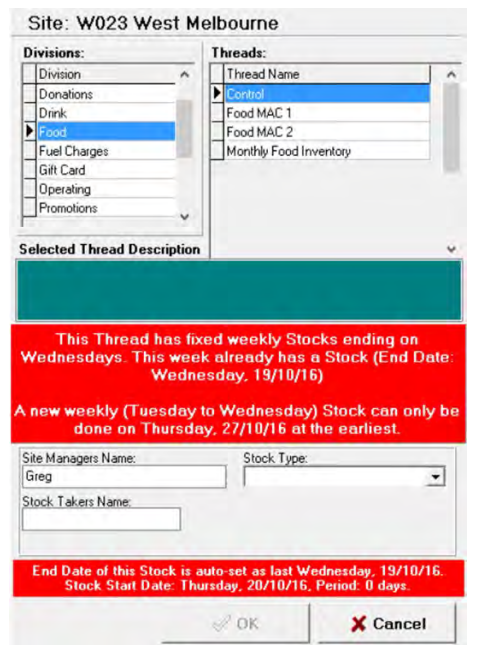
If another user tries another Stock on the same Thread one day later, for example on the 22 October (Saturday), because the stock for `this week' was already done, a new stock is not possible. The system does not allow a new stock and the red label informs the user why (and when the next stock can be attempted). In the example image below, it says "...on Thursday, 27/10/2016 at the earliest"
If the user did come back on the 27th October as instructed, then the new Stock would now be possible and it is now exactly one week long.
However, if the user did not come back on the 27th, or indeed for a whole other week, then the possibility to do the stock for that week is gone.
If the user came back on 4th November, then the only available End Date is the latest Wednesday, i.e. 2nd November, leading to a 2-week stock instead of 1-week.
If the user still did not do a stock and came back after another week, then the stock would be 3-weeks long.
There is no problem doing fixed day-of-week stocks after normal stocks or viceversa, the system simply applies the stock rules in accordance to the Thread settings valid at the time the new stock is started.
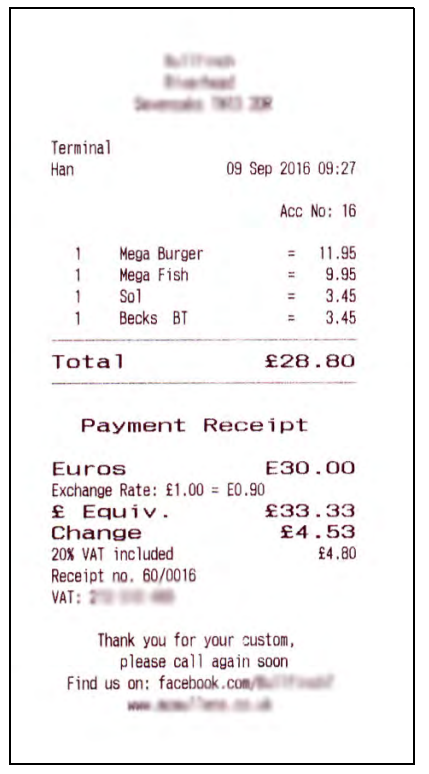
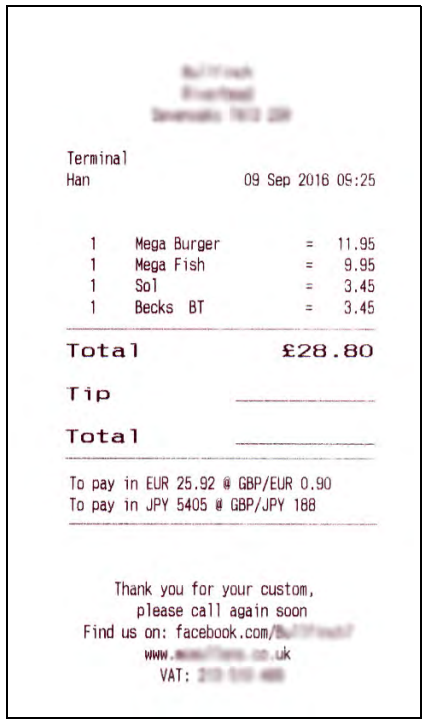
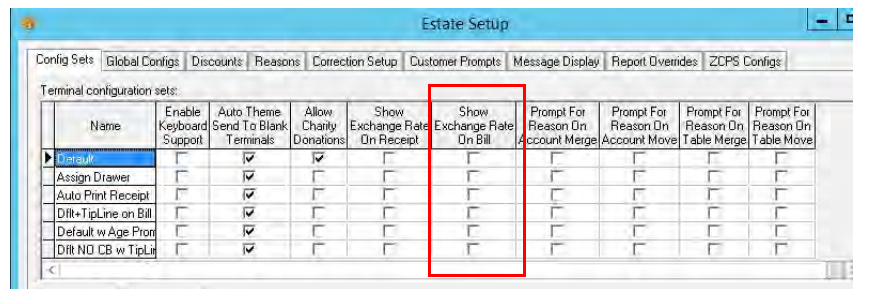
Show Exchange Rate on Receipt - Zonal ID PM885
Previously, when a receipt was produced, it included just the foreign currency payment (as shown in the example below):

The system has been updated to now also include the exchange rate that was applied at that time.
The exchange rate is shown to two decimal places between the Foreign Currency payment line and the Default currency equivalent line in the format:
Exchange Rate: [A single unit of the default currency] = [corresponding value of foreign currency used for payment]
Head Office Configuration - Enable Feature
The new feature is configured within the Estate Setup window in Aztec Theme Modelling by selecting the new ‘Show Exchange Rate on Receipt’ check-box per Config Set.
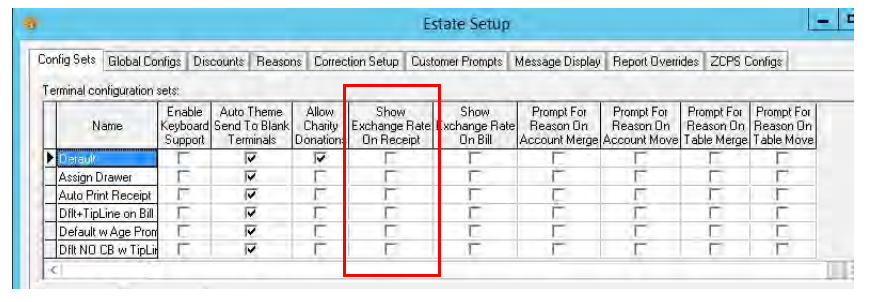
When a site is initially upgraded to Aztec v3.8.4, or when a new config set is created, the system default setting is ‘Off’.
Head Office Configuration - Send Changes to Sites
For the new settings made at Head Office to take effect at site, perform a communications job to the required sites.
For detailed information on running communications jobs click here.
Add Discount to Promotional Saving on Bill - Zonal ID PM886
The new configuration enables the choice of one, two or all of the following options:
-
Promotional Savings
-
Discount Savings
-
Total Savings
When configured, the options chosen are shown at the foot of the bill (see example below):
If one of the selected options has a value of £0.00, then that line is not included on the bill / receipt.
In cases where the total value of all promotional savings benefits the company, as opposed to customer, it is not included in the Total Savings value.
In cases where Promotional Savings are set as Hidden, it is not included in the Total Savings value.
Head Office Configuration - Enable Feature
The new feature is configured within the Aztec Theme Modelling | Site Setup | Printing tab.
Head Office Configuration - Send Changes to Sites
For the new settings made at Head Office to take effect at site, perform a communications job to the required sites.
For detailed information on running communications jobs click here.
Apply Discount to a Single Item - Zonal ID PM887
For example, this functionality could be used to discount a dish where there was previously a quality issue and enables tracking to see if there is an ongoing issue with this item. Previous discount functionality didn’t allow visibility of a single item being discounted.
Single item discounts are apportioned between a parent product and any child products it may have, unless the parent or child is specifically selected for the discount when it is set up. This may produce unexpected end results when analysing single item discounts applied. Please pay particular attention to the rules and examples described in the following section.
Single Item Discount Rules and Examples
The single item discount function behaves more like a correction than a traditional discount.
These item discounts apply to the entire recipe, including any children with supplemental prices and any ‘And’ed’ children, similar to other corrections.
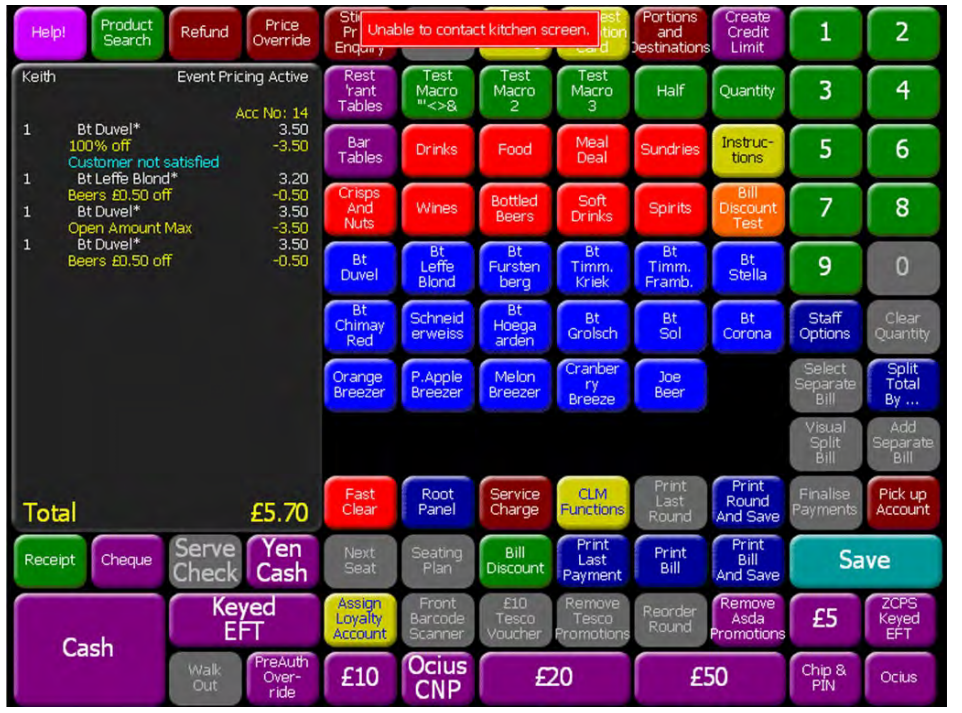
If a discount is applied to a product that is promoted, the discount value will be based on the pre-promoted price. The promotion may be capped at the time of the discount or later on so that all the promoted items plus any discount do not result in a negative value:
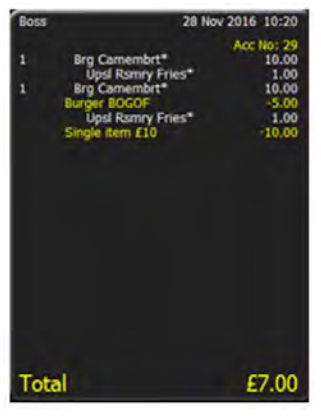
Example (pre and post single item discount)
Sell 2 Burgers @ £10 with £1 supplement price on a choice.
The Burgers are in a BOGOF promo for 50% of 1 burger when you buy two.
Apply a £10 fixed amount single item discount to both burgers:
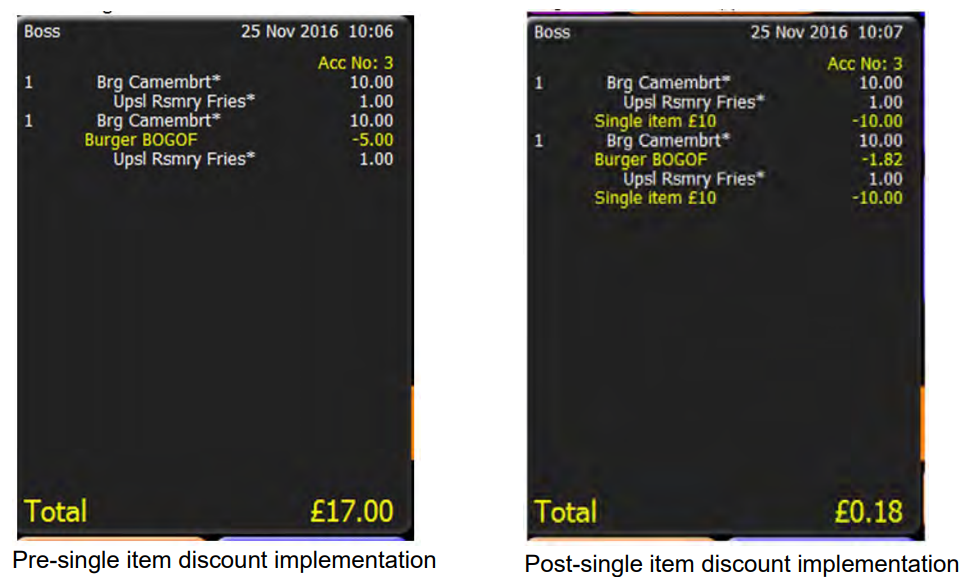
The above differences highlight the new rules. The £10 off each burger orderline family is shared between the £11 total with £9.09 going to each burger. The burger BOGOF that promotes both burgers is capped at £1.82 so that bill does not go negative.
Head Office Configuration - Discount Setup
The Head Office user can create bill discounts, via Aztec Theme Modelling, that apply to single items only. Once a discount has been defined as applying to a single item it cannot, after the discount has been saved, be edited to apply to the whole account and vice versa. Future editing of the discount will display to the user with the ‘Only applies to single items’ disabled and a suitable tool-tip hint (both shown in the example image below).
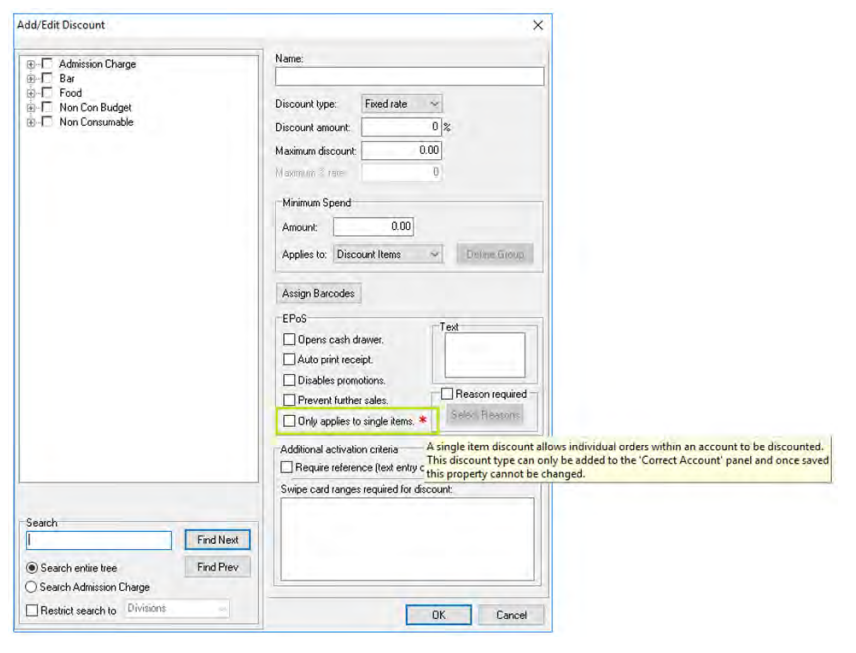
Single Item Discount types can be Open Amount, Fixed Amount, Open Rate and Fixed Rate.
When a discount has the ‘Only applies to single items’ attribute set, the following attributes of a discount are not applicable to this discount:
-
'Maximum discount' is inapplicable to discount types ‘Fixed rate’, ‘Open Rate’ and ‘Open Amount’
-
'Additional activation criteria'
-
'Disables Promotions'
-
'Prevent Further Sales'
-
'Minimum Spend'
-
'Assign Barcodes'
Single Item discounts are not applicable for use as CLM discounts
Single item discounts are given their own place in the button picker hierarchy. The ‘Apply Discount’ section has been renamed ‘Apply Whole Account Discount’ and a new section ‘Apply Single Item Discount’ is introduced.
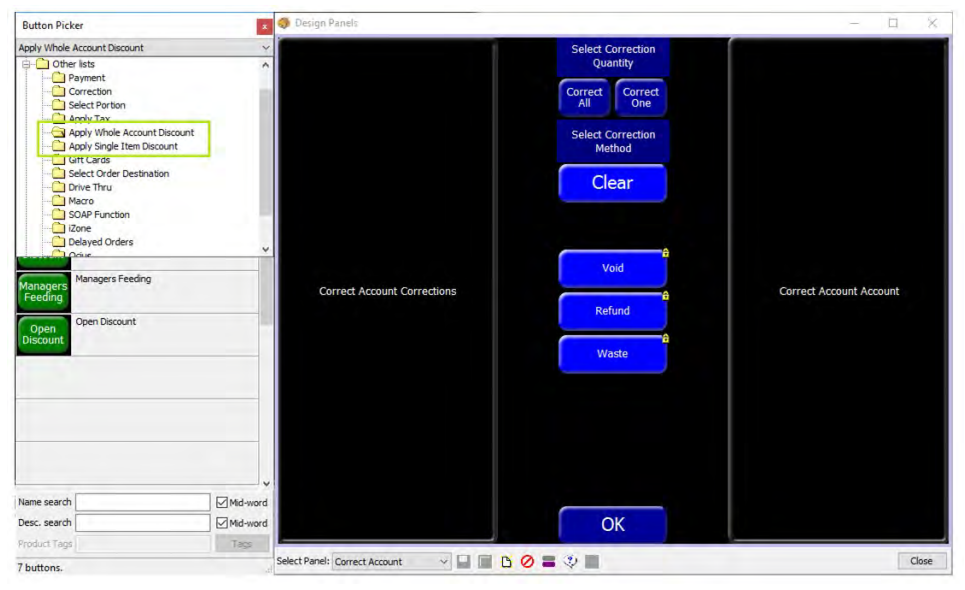
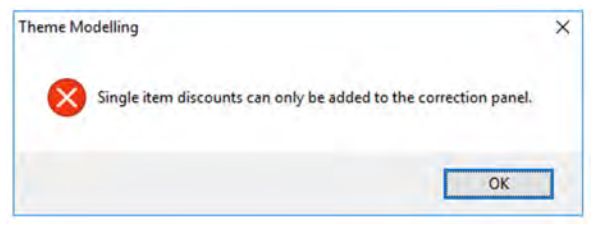
Single item discounts can only be added to the correct account panel. If an attempt is made to add a single item discount onto any other panel, an appropriate error message is displayed.
Front of House Operations
‘Apply Discount’ buttons can be added to the Correct Account screen. They toggle in the same way as the Select Correction Method/ Set Correction Mode buttons.
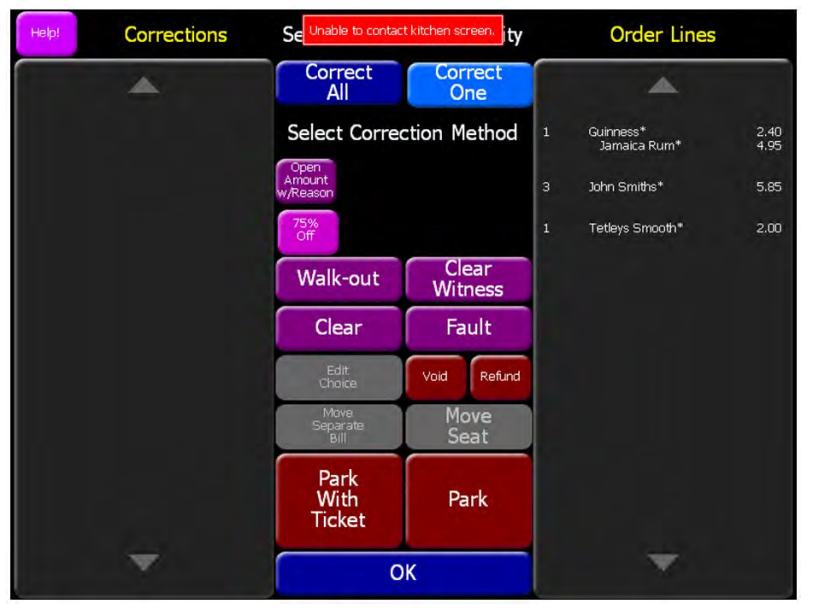
When an orderline family with a multiple quantity and ‘Correct one’ is selected (John Smiths in the example) an item with quantity one is split off and moved to the end of the account (by correcting it off and uncorrecting it using a corrected method specified in the model) and the discount applied.
‘And’ed’ children are discounted with their parent in the same way as other corrections (in the example below, Jamaica Rum is an ‘And’ed’ child).
The sum of the orderline prices that match the product group is used for the discount maximum:

Discounts that prompt for reasons and open amounts can be used:
Account discounts can be applied after a single product discount:
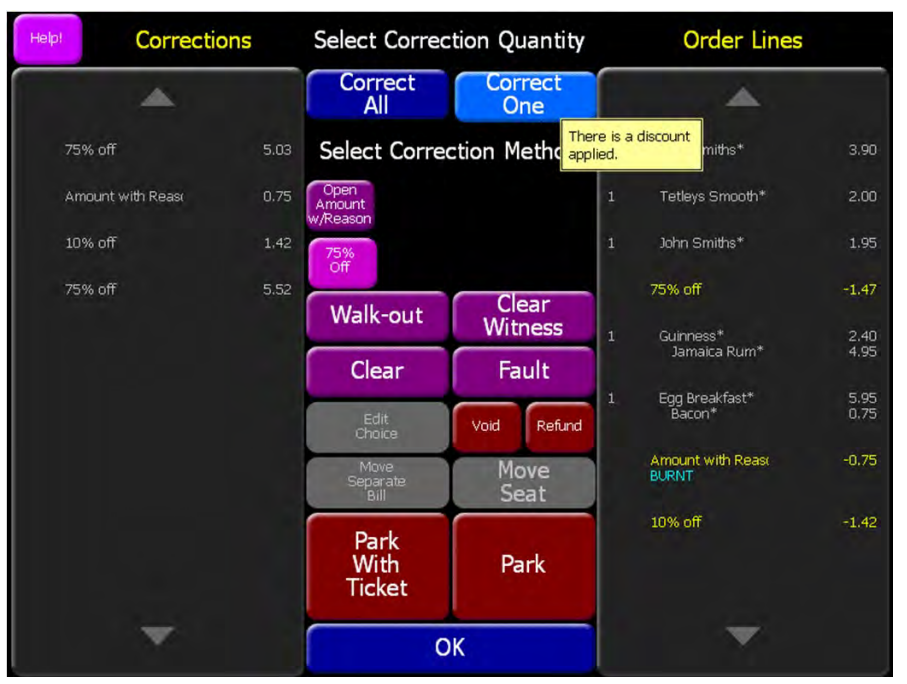
After an account discount is applied, a product discount cannot be applied - displaying a NOGO reason of ‘There is a discount applied’ with other corrects. Only one product discount can be applied to an orderline family:
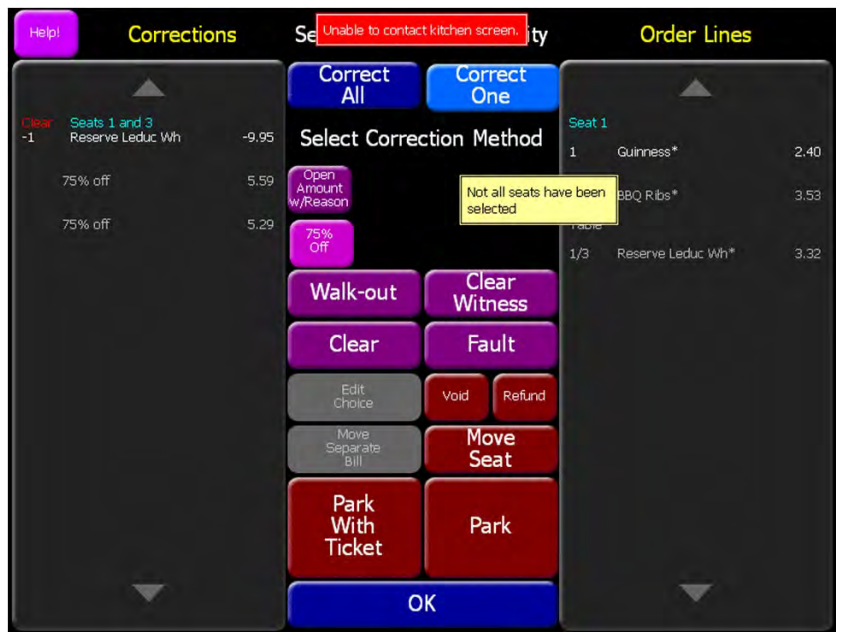
On a per seat table, if a product is rung up on a couple of seats and then the view changed to a single seat, the product cannot be discounted. If selected, the NOGO will display ‘Not all seats have been selected’. For separate bills, the NOGO will inform the POS user ‘Not all bills have been selected’. If the selected view includes the seats that a product was rung up with, it can be discounted; this enables discounts to be applied to drive-thru accounts with multiple bills:
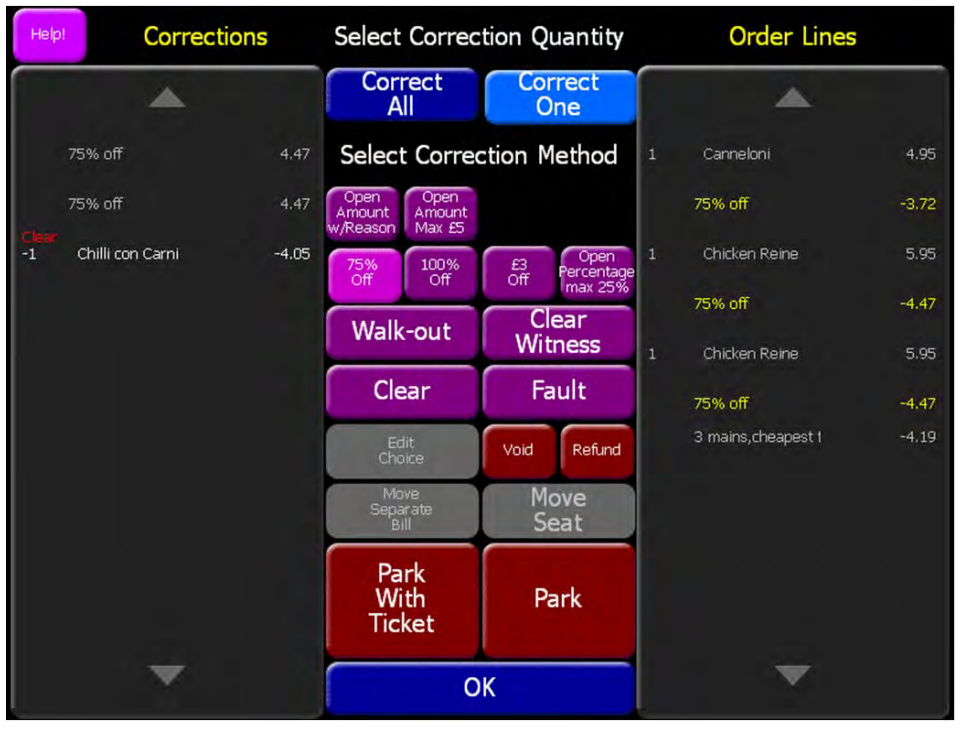
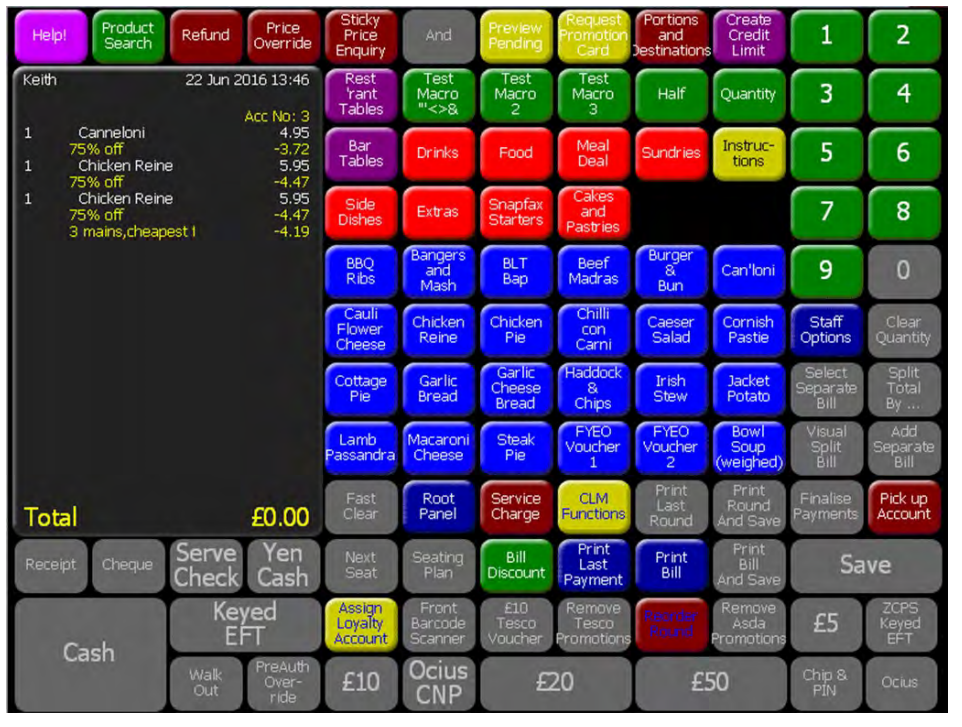
A product discount can be applied to a product that is promoted; the discounted amount is based on the full price without any promotions. In the example below,the promotion is ‘3 mains cheapest free’, the promoted amount is 4.95 as this is the price of the cheapest (Cannelloni):

It does not matter to which product the promotion is applied. In the example below, the promotion is ‘3 mains cheapest free’, the promoted amount is 5.95 as this is the price of the cheapest (Chicken Reine):
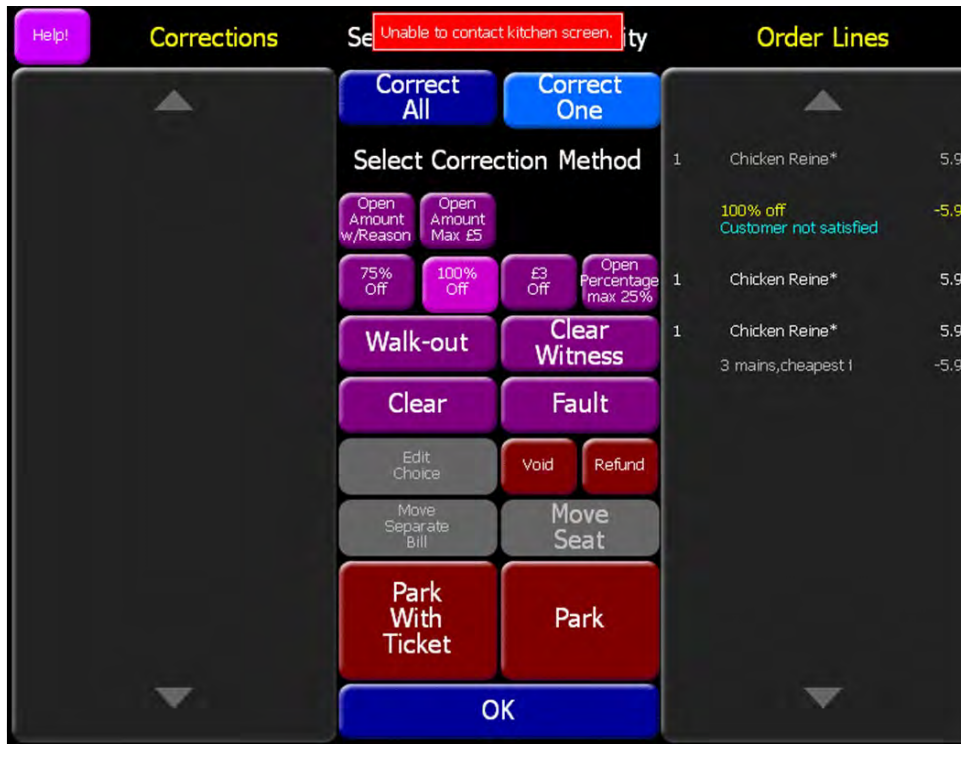
The promotion may be capped at the time of the discount, or later on so that all the promoted items plus any discount do not result in a negative value. In the example below, the promotion has been capped at 4.19 (which gives an account balance of 0.00) rather than 4.95:
Apply a discount and the promotion ‘Buy 2 beers both ½ price’ is more beneficial to the customer than might be expected because they get the full promotional saving and the discount:
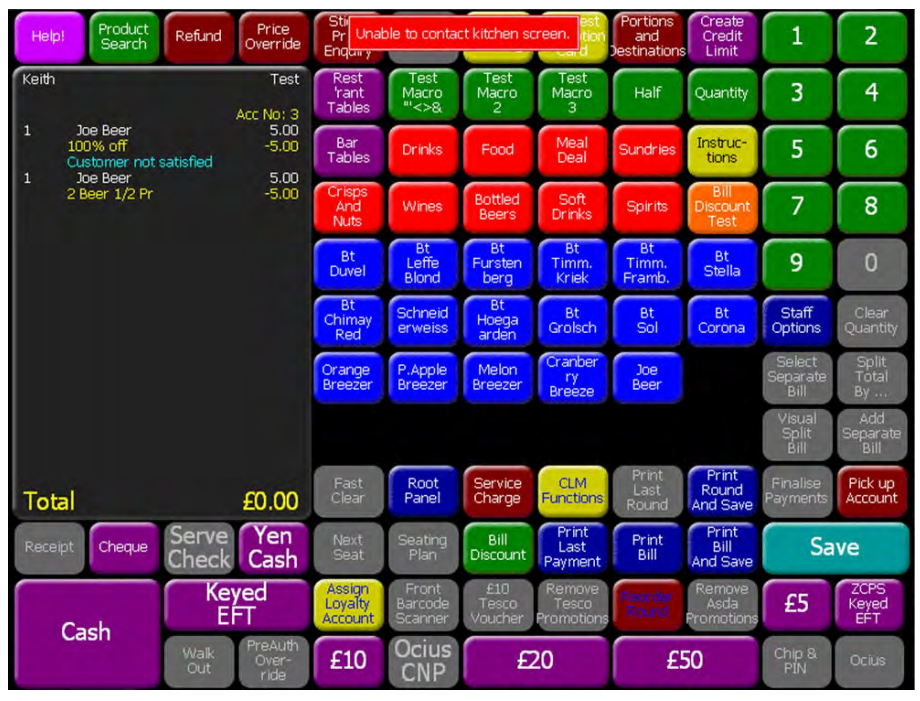
Promotions are hidden if it is capped and the new amount saved is zero. For example, a single item is promoted and also given a 100% discount:
If an Account Discount button is placed on the Correct Account dialog, the NOGO informs the user "This type of discount must not be on the corrections screen". If a product discount is not on the Correct Account dialog, the NOGO informs the user "This type of discount must be on the corrections screen".
When a discount with a product group is applied the orderlines not in the group have a NOGO that informs the user "There are no sales relevant to this discount.":
If only child items match the group, they are discounted.
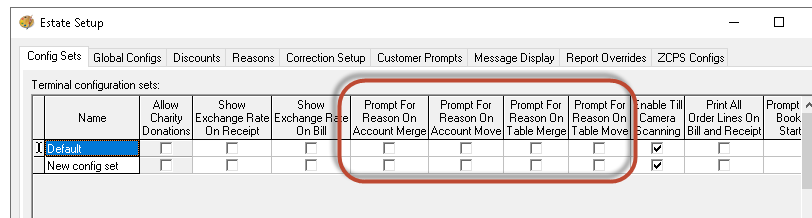
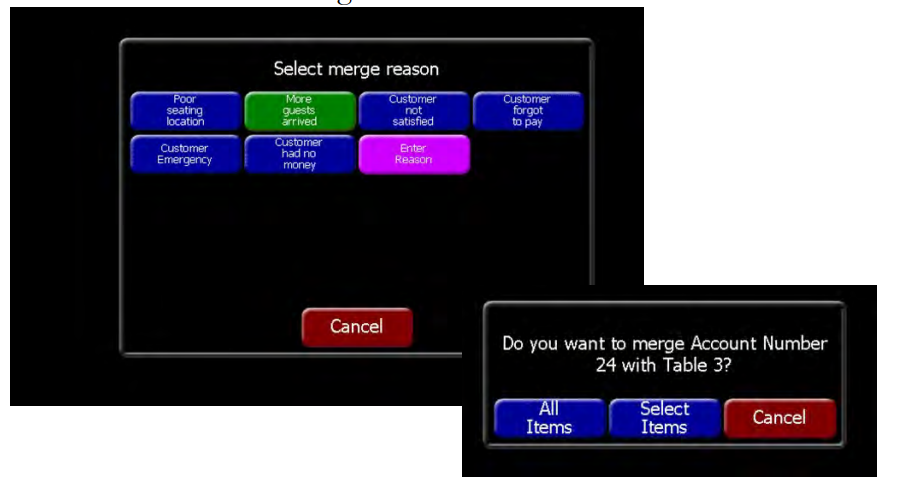
Account / Table Move & Merge Reasons (POS) - Zonal ID PM888
Similarly Account Merges (account with number but no table merged to another account) and Account Moves (account with an account number assigned a table) can be configured separately to trigger a reason capture prompt.
All reasons entered by POS users are noted by the audit trail and are sent routinely to Head Office (during the normal comms process) where they are stored in the Aztec Database for reporting purposes. Reasons are never included on printed customer bills or receipts.
Head Office Configuration - Enable Feature
A Head Office user can decide which POS terminals prompt for a reason by enabling the appropriate options within the relevant terminal configuration set(s) mapped to those terminals.
The following four new configurations have been added to the terminal config set tab page in the Estate Setup window in Aztec Theme Modelling:
-
Prompt For Reason On Account Merge
-
Prompt For Reason On Account Move
-
Prompt For Reason On Table Merge
-
Prompt For Reason On Table Move
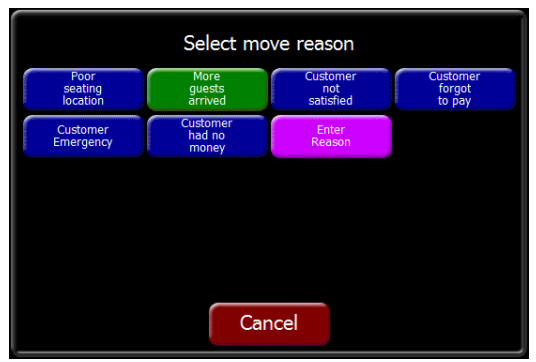
Also within Aztec Theme Modelling at Head Office, users can create and choose the range of reasons that can be selected from a POS terminal when a site POS user moves or merges tables or accounts.
Within Aztec Theme Modelling | Estate Setup | Reasons tab, a list of defined reasons is shown on the left. From this screen you can add new reasons and define the button text that is associated with the reason(s).
Click the Table Move/Merge Reasons button to display the Table Move/Merge reasons screen.
Only reasons contained in the right-hand list, named Selected Reasons, are displayed for selection on the site POS terminal. Add or remove reasons by using the left (remove from selected) or right (add to selected) arrow buttons.
Head Office Configuration - Send Changes to Sites
For the new settings made at Head Office to take effect at site, perform a communications job to the required sites.
For detailed information on running communications jobs click here.
Front of House Operations
On the POS terminal, when reason capture is configured, the POS user must select a reason before the confirmation dialogue to complete the move or merge is displayed.
The user simply selects one of the reasons in order to continue to confirm the move or merge. If an Open Reason type is selected, the POS user must type in a text entry.
If a POS user selects a table or account to move or merge the dialog of defined reasons will be displayed:
.
Enhanced Server Money Belt Report - Zonal ID PM890
At Head Office, open Aztec Base Data | Estate Settings | [selected site(s)] | Finance | Declarations and Counts tab | Money Belt Settings section:
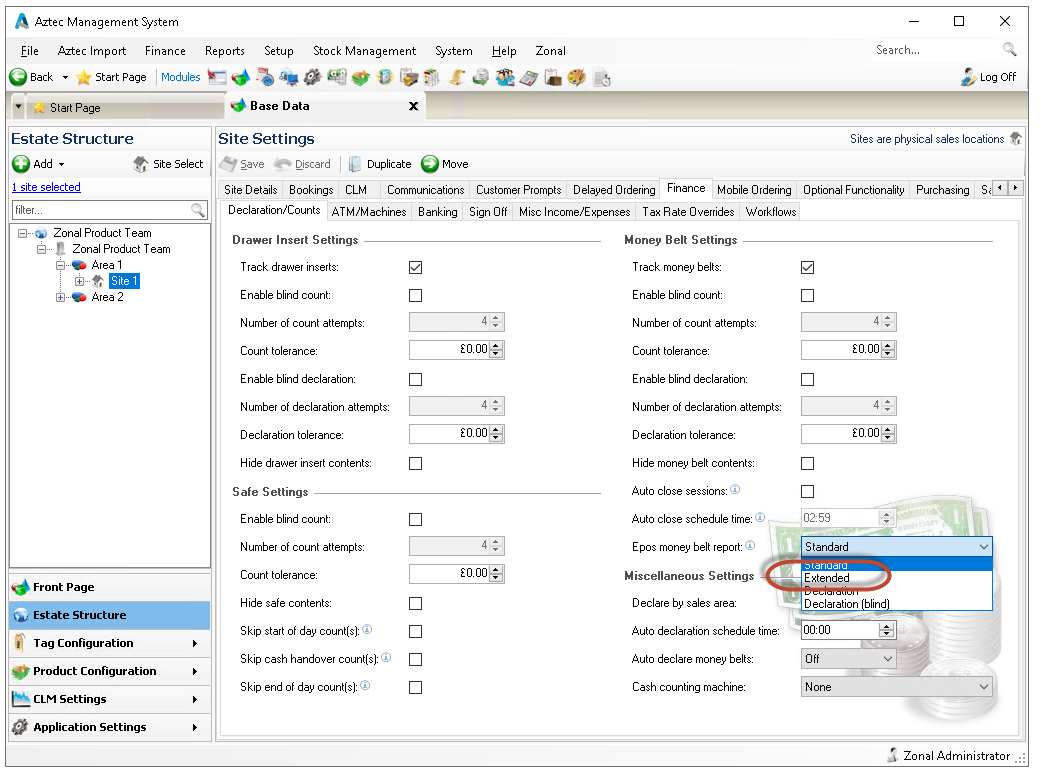
To ensure a Money belt insert number is assigned to a server, select the Track money belts check box.
The new more detailed Money belt report can be selected by choosing 'Extended' and the setting can be applied to multiple sites by multi-selecting the sites in the Estate Structure.
Front of House Operations
The new report shows information based on all accounts, tables and tabs that the server has taken a payment for in the session.
The printed version of the report is limited to 40 characters per row, but the data in the Deposits Received section can be up to 54 characters. The version of the report displayed on the POS terminal always shows the complete values up to the maximum size.
The new extended report contains the following information:
-
Server Name
-
Money belt Insert Number assigned to the server
-
The Start / End Time and Date of the money belt session
-
Unique number to identify this instance of the report. This is derived from the Site ID plus the id of the session
-
Payment Summary showing each payment method as a separate row and the total value of payments received via each method. Note the following:
-
Each Payment line is inclusive of payments made for gift card top-ups
-
Each Payment line is inclusive of VAT, gratuities and service charges
-
There will not be a line for a payment method if no value exists for it
-
A Cash payment method line will be shown for each currency (base and foreign). The Aztec BoH exchange rate is used to convert foreign to base currency
-
Credit Card Payments have a line for each card scheme (e.g. Visa, Amex)
-
Payments made to Account have a line entry if value exists
-
Payments made by Gift Card have a line entry if value exists
-
Voucher payments have a line entry if value exists
-
Deposit redemptions have a line entry if value exists
-
A Total is displayed for all the payments listed in this Payments Summary
-
-
Service Charge and Gratuities showing a total value for Service Charges applied, a Gratuities (tips) total and a combined total value of Service Charges and Tips. Note: Any tips and service charges collected on cash drawer payments during the money belt session are NOT be included here
-
Transaction Details section showing each table / tab that the server has taken a payment for, displaying the following:
-
Table / Tab number
-
Cover count
-
Total Value
-
List of each payment taken by the server (Value of the payment, Payment method type, Gratuity (total tips taken by the server), Service Charge, Time the table / account was opened and closed. If multiple payments of the same type exist for a table / account then the rows are combined. The list of accounts / tables / tabs are ordered by Table / Account number (descending)
-
-
Adjustments section – A row is displayed for each correction type applied to a table:
-
Discount
-
Promotion
-
Transfer
-
Table Move
-
Payment Reversals by payment method
-
Extra information: Count = Number of discounts / promotions that have been applied or number of accounts merged into this one. Value = Total saving (discounts / promotions), value of orders moved or merged to another table. Note: This will only ever show for tables that were part paid by the employee before it was moved / merged, because only tables with payments by the employee are to be shown on the report
-
-
Summary section displaying all accounts that were not on tab / table, that the server has taken a payment for
-
The content of this section contains the same details as shown for each table
-
If there is a split payment, then each server will see the amount for the payment that they made
-
-
Team Statistics section displaying:
-
Table breakdown
-
Total number of tables for the session
-
Total number of covers for tables in the session
-
Total Gross Value of tendered payments for tables in the session
-
-
Offline Code Summary section displaying:
-
A list of Eagle Eye offline codes redeemed
-
The quantity of each offline code types redeemed
-
A total amount that reflects the total value of each code type redeemed
-
-
Deposits Received section displaying:
-
A list of deposits received
-
Customer name associated with each deposit taken
-
Date of when the deposit was taken
-
Reference associated with each deposit
-
Value of each deposit
-
-
Gift Card Sales section displaying:
-
Number of gift cards sold in the session
-
Total value of gift cards sold in the session
-
Transfer Single Item to a Table - Zonal ID PM897
Front of House Operations - Manual selection of orderlines to merge (if both accounts have orderlines)
-
User selects current table/account
-
User reselects table plan or selects pick up account dialog
-
If reasons have been configured then a reason is selected:
The `Select Items’ NOGO will inform the user with the following messages:
-
if currently on a per seat table - "The current account is on a per-seat table"
-
if currently on a delayed order account - "The current account has delayed orders"
-
if currently on an account with multiple bills - "There are separate bills on the account"
-
if a per seat table is selected to merge with - "Cannot select items from a per seat table"
-
if current account requires it - "Card validation required before account can be saved"
-
if thecurrent account is a bar account that cannot be saved because it has a product on it that can only be saved on a table - "The current account is not on a table"
If ‘Select Items’ is pressed:
-
If either account is selected by another user and they confirm that they wish to pick up the ‘in use’ account then they will be presented with this dialog again.
Manual selection of orderlines to move (if an account is moved to an empty table)
-
User selects current table / account
-
User reselects table plan or selects pick up account dialog
-
If reasons have been configured then a reason is selected
The ‘Select Items’ will be NOGOed with the same reasons as on the merge confirmation dialog (described on the previous example)
If ‘Select Items’ is pressed:
If all the orderlines are moved off an account, when OK is pressed the account will be closed by transferring anything remaining to the other account in the same way as ‘move all items’.
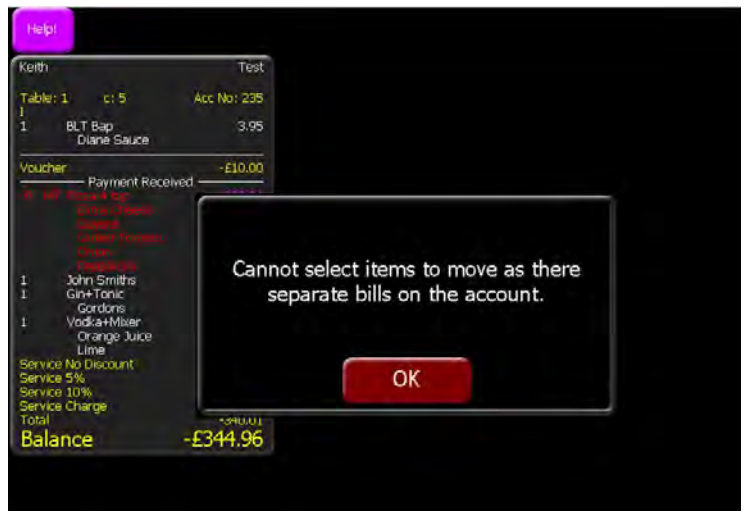
The following error dialog is displayed if ‘Select Items’ is pressed when the account selected has multiple bills on it:
Reporting
The Extended Money Belt Report’ will include individually moved items in the ‘Transfer In’ and ‘Table Move’ figures. These figures are displayed per Table / Account
within the Transaction Details section of the report.
For example, if two orderlines with a value of £1 each are moved from table 5 to table 9, the ‘Table Move’ amount for table 5 will be £2 as will the ‘Transfer In’ amount for table 9. The count associated with these figures will reflect the number of accounts involved so will be set to 1 for each.
Show Exchange Rate on Bill - Zonal ID PM898
Head Office Configuration - Enable Feature
The new feature is configured within the Estate Setup window in Aztec Theme Modelling by selecting the new ‘Show Exchange Rate on Bill’ check box per Config Set.
When a site is initially upgraded to Aztec v3.8.4, or when a new config set is created, the system default setting is ‘Off’.
At Head Office, in Aztec Finance | Configuration | Currency Details, the option ‘Show Exchange Rate on Bill’ must be enabled for each non-base currency to be included on the bill.
Head Office Configuration - Send Changes to Sites
For the new settings made at Head Office to take effect at site, perform a communications job to the required sites.
For detailed information on running communications jobs click here.
Banking Figure to Exclude Float - Zonal ID PM900
Head Office Configuration
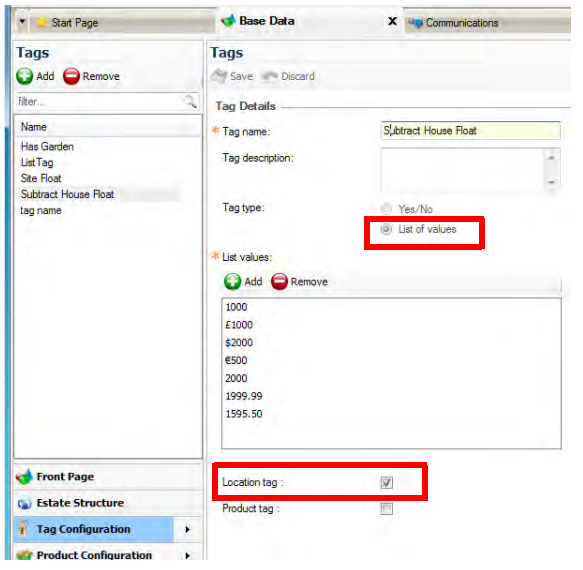
At Head Office in Aztec Base Data | Tag Configuration, you must first set up a list type Location Tag named ‘Subtract House Float’ and populate the list with one or more valid house float values. Note that the name is not case sensitive but it must be named exactly or it will be ignored.
Also within Aztec Base Data | Estate Structure at Head Office, the new tag value(s) need to be assigned at site level.
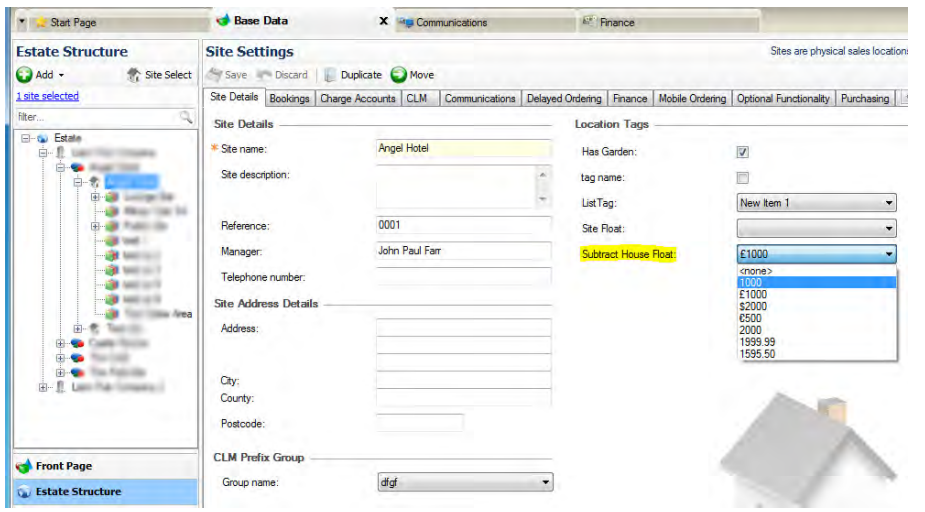
In order for the house float to be deducted from the ‘available to bank figure’ the site must be configured to use a single safe (Aztec Base Data | Estate Structure | Site level | Finance | Banking). This is because a banking operation is performed against the (base currency) amount available in the selected safe
Site Operations
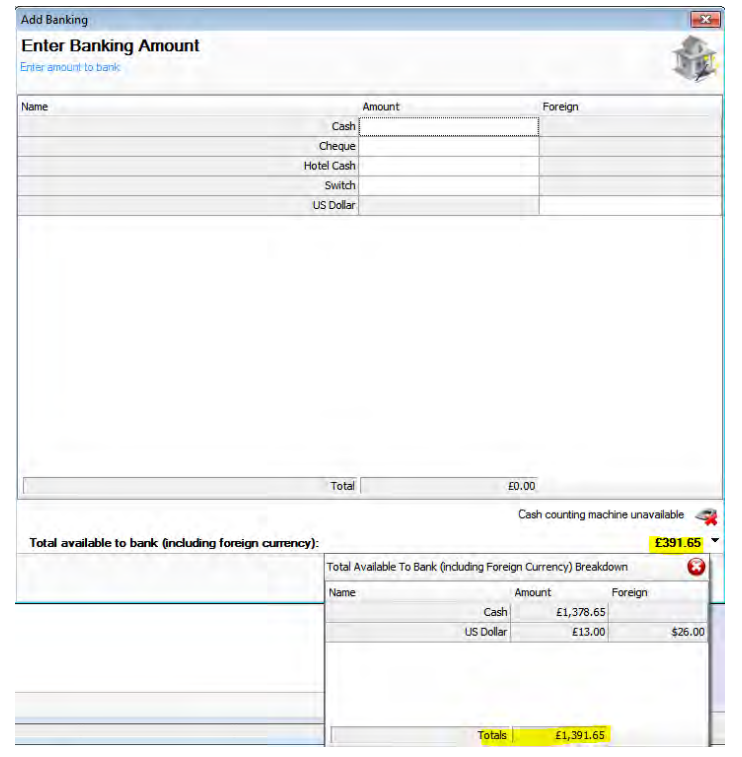
When the site BoH user performs a Banking operation during a standard banking, skim, or work flow, they are prompted to enter an amount to bank. At this point they are shown the “Available to bank” figure (if configured). The available to bank figure is the total of all bankable funds in the safe in base currency (including foreign currency).
The configured house float amount is deducted from the available to bank amount. If the house float amount is greater than the available to bank amount, then the available to bank figure will be zero.
When a new banking is started the following screen is presented. The example below shows the available to bank amount minus the house float. Note that the drop-down grid (when available) still shows the total bankable amounts prior to the house float deduction.
Reporting
When just the tag ‘House float’ is used, the 7 Day Statement of Trade report shows the value set for this tag.
When just the tag ‘Subtract House Float’ is used, then the 7 Day Statement of Trade report shows the value for this tag, but still showing the text ‘House Float’.
When both tags are set for a site, the 7 Day Statement of Trade report shows only the value set against the ‘House Float’ tag only.
Allow Theme Button Security to be Reset to pre-bill Print Setting - Zonal ID PM909
A new feature is further introduced to make it possible to revert an account / table to the state prior to the bill print so that pre-bill print button security is applied.
This is useful in the scenario where a bill has been printed in error, allowing the security on the account to be rolled back so that staff members do not need to obtain authorisation every time they want to perform an action on the account.
Head Office Configuration - Add button to Theme
The Unlock Bill Security button needs to be added to the relevant theme, this can be found in the button picker under Functions | Ordering
For detailed information on adding buttons to theme panels root or local panels click here or for shared / variation panels here.
Head Office Configuration - Send Changes to Sites
For the new settings made at Head Office to take effect at site, perform a communications job to the required sites.
For detailed information on running communications jobs click here.
Front of House Operations
The new Unlock Bill Security button when added to a theme panel operates like a normal toggle on and toggle off button.
Mask iZone Gift Card Numbers - Zonal ID PM910
The change is introduced in Aztec 3.8.4 and the iZone plugin 1.15.0. Any combinations using an older version of either will not show this new feature.
Head Office Configuration
-
Open Aztec Base Data and select Estate Structure | Site Settings tab
-
Select one or more sites and navigate to the CLM tab
-
Within the CLM Plugin Settings section, change the plugin to iZone. The new configuration is shown at the bottom of this group of fields "Mask Card Number
Front of House Operations
All POS screens that show iZone card numbers will now have the number masked:
The following print-outs (if applicable) will also have the number masked:
-
Top up receipts
-
Balance check receipts
-
Payment receipts
-
Reversal / Refund receipts
Audit iZone Balance Check Transactions - Zonal ID PM911
Previously, audit checks were limited to e-Gift Balance Checks. To improve fraud identification, this new feature introduces audit reporting on iZone plugin transactions that highlight fraudulent attempts to find an iZone Gift Card number which has an outstanding balance.
This data is not displayed to Aztec head office or site users but is stored in the Aztec database and can be utilised on request by Zonal Business Systems for the creation of bespoke reports.
Clarabridge Guest Survey Invitation Code - Zonal ID PM915
If the system is configured to generate a Clarabridge code, the code will be a thirteen digit reference number with the following specification (example code layout for references below: 1111223333334):
-
The first four digits (1111) are taken from the Aztec Site Reference. If the Aztec Site Reference has fewer than four digits then the reference is prefixed with leading zeros to make it up four digits. If the site reference has more than four digits, then the last four digits in the reference are used. If the site reference contains anything other than numeric data, this will result in a Send to POS error
-
Digits 5 and 6 of the code (22), use the last two digits of the Device ID associated to the terminal that triggered the promotional footer
-
The last six digits of the Aztec Account ID are used to populate digits 6-12 of the code (333333)
-
The final digit (4) is a Luhn (Mod 10) check digit
Head Office Configuration - Enabling Survey Codes
Head office users can configure which receipt survey code provider will be used for each site.
-
Open Aztec Theme Modelling | Site Setup | Miscellaneous tab
-
Select the required survey code supplier from the drop-down list
-
Select Close to save your changes and return to the Aztec Theme Modelling main menu.
-
Select Promotional Footers
-
Create the required promotional footer assigning the survey code option within the 'Footer Text'
Head Office Configuration - Send Changes to Sites
For the new settings made at Head Office to take effect at site, perform a communications job to the required sites.
For detailed information on running communications jobs click here.
Request Ocius PED System Info Print from POS - Zonal ID PM919
This new feature adds a new button to the Aztec theme to allow POS users to choose to print system information, select a PED and obtain a system information slip for that chosen PED.
Head Office Configuration - Add button to Theme
The Ocius Sys Info Print button needs to be added to the relevant theme, this can be found in the button picker under Other Lists | Ocius
For detailed information on adding buttons to theme panels root or local panels click here or for shared / variation panels here.
Head Office Configuration - Send Changes to Sites
For the new settings made at Head Office to take effect at site, perform a communications job to the required sites.
For detailed information on running communications jobs click here.
Front of House Operations
When a PED has an integrated printer, the integrated printer produces the system information slip. When a PED does not have an integrated printer, the system information slip is printed as defined in the EFT print stream for the POS terminal that was used to make the system information print request.
New Money Belt Report - Zonal ID PM927
This report has been developed purely for the UK and will only ever use the £ currency symbol. The layout of the report is exactly as described below and other non-standard/non-UK currency denominations defined in your system, will not appear in this report
The report uses the standard report header containing the site name and contact details, and displays all accounts for which the server has taken a payment during the session.
The Money Belt Declarations report is a new feature in Aztec 3.8.4. Any sites using older versions of Aztec will continue to see the standard money belt report.
Head Office Configuration
The Money Belt Declarations report can be configured at head office to be printed automatically when a money belt session is ended at site.
It can be enabled from either Aztec Base Data or Aztec Finance:
-
Aztec Base Data| Estate Structure | Site Settings
-
Aztec Finance| Configuration | Estate Settings | Site Settings
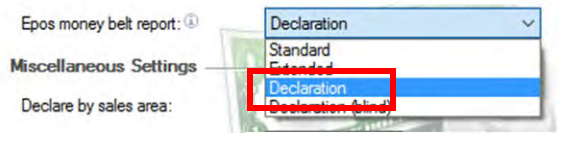
Head office users can configure a site to use the new declaration money belt report by selecting Declaration (blind) from the EPoS Money Belt report dropdown list.

You can apply this setting to a group of sites by multi-selecting the sites in the tree view before changing the setting.
You can also configure non-cash payments to be displayed on the report. By configuring a payment method to be auto-declared, the total taken by that payment method during the session is printed in the bottom half of the report. Auto-declared payments with zero amounts are not displayed.
To configure a payment method to be auto-declared:
-
Open Aztec Finance | Configuration | Payment Methods
-
Select the 'Auto Declare' check box
-
Select Save
Head Office Configuration - Send Changes to Sites
For the new settings made at Head Office to take effect at site, perform a communications job to the required sites.
For detailed information on running communications jobs click here.
Front of House Operations
If a site is configured to use the Declaration Money Belt report, whenever an POS terminal requests a money belt report, the Declaration Money Belt report is printed as per the examples shown:
Barcodes are only printed on Zebra ZQ510 printers, other printers will print the rest of the report but omit the barcode.
The barcode number is made up of the site ID prefixed to the session ID
New Wireless Printer - Zonal ID PM929
The Zebra ZQ510 series offers excellent WLAN performance and can connect to both fixed-wire POS terminals and iServe devices.
Head Office Configuration
The Zebra ZQ510 printer can be attached to all device types (POS, Virtual Terminal, server) in Aztec Theme Modelling on a site-by-site basis from the list of peripherals in Aztec Theme Modelling | Site Setup:
POS user PINs Configurable at Head Office - Zonal ID PM933
Head office users can grant FoH users access to one site, multiple sites or all sites in their company by selecting the appropriate check-boxes in the Modify Location Access Permissions window (Aztec Staff & Security | Users | Location Access).
Head Office Configuration - Enable Feature
The setting to manage FoH PINs at Head Office can be found in Aztec Base Data | Estate Structure | Staff & Security
When this setting is enabled at head office, the User section of Staff & Security at site becomes unavailable
The two-step login process is incompatible with managing FoH PINs at head office:
-
If the two-step login is enabled at site you cannot enable the Manage FoH PINs at head office
-
If Manage FoH PINs is enabled at head office, you cannot enable the two step login at site
Two new dialogs have been added to notify the user of the effect of changing the Manage FoH PIN setting:
-
When the Manage FoH PINs setting is enabled:

-
When the Manage FoH PINs setting is disabled:
Updating a User PIN
When Manage FoH PINs is enabled at Head Office you need to assign a FoH PIN to each user.
To assign or update a user’s FoH PIN
-
Open Aztec Staff & Security | Users | Select User
-
From the User Details tab select Change
A random 4-digit PIN that is unique in Aztec is generated and displayed for your information
If a PIN number has already been assigned, the Change button is disabled. To generate a new PIN, click Clear and re-select Change
-
Select Save
-
Inform the POS operator of their new PIN
Disable Camera Scanner on i700 - Zonal ID PM936
For client systems that do not have unique identifiers presented by QR code, a new configuration has been introduced to prevent the camera scanner being switched on in this way.
This new configuration is enabled by default to activate POS scanning. If deselected, both the front and rear cameras on the POS will be disabled.
Head Office Configuration
To configure automatic camera operation:
-
Open Aztec Theme Modelling | Estate Setup | Config Sets tab
-
Select or deselect the Enable Till Camera Scanning check box as required
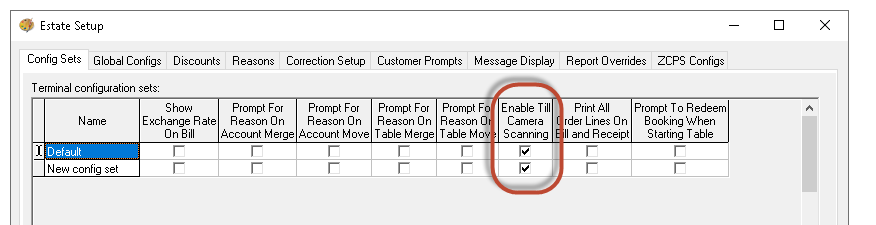
Head Office Configuration - Send Changes to Sites
For the new settings made at Head Office to take effect at site, perform a communications job to the required sites.
For detailed information on running communications jobs click here.
Printing of All Orderlines on Bill and Receipt - Zonal ID PM937
Head Office Configuration
-
Open Aztec Theme Modelling | Estate Setup | Config Sets tab
-
Select the Print All Order Lines On Bill and Receipt check-box
Head Office Configuration - Send Changes to Sites
For the new settings made at Head Office to take effect at site, perform a communications job to the required sites.
For detailed information on running communications jobs click here.

Allow 3rd party Applications to use 'Extra' Functionality - Zonal ID PM939
Consumers of the virtual terminal API (such as third-party applications, iServe and iOrder), can now ring up extra portions of a default option and of a selected non-default option.
Extra portions rung up via the API respect the min/max settings for the associated choice and multi-level conversational ordering is supported.
Extra portions rung up via the API appear in the Aztec account exactly as they would do when rung up on physical POS terminals. This does not include AND’d items.
Alternative Survey PIN code Generation for FeeditBack - Zonal ID PM941
This change request enhances the FeeditBack survey PIN generation algorithm by changing certain restrictions that were present previously, such as:
-
the previous PIN used the site reference value that had to be numeric with a maximum of 5 digits
-
the 12-character PIN that was generated in Aztec was confusing and difficult to interpret accurately due to its length
The New PIN:
-
is based on the site ID (not the site reference). This is a database generated number which has the same format for all sites and allows all customers to be potential FeeditBack users
-
is 9 (alpha-numeric) digits long and has a placed hyphen every 3 letters (123-123-123) to make the number easier to read
Mobile Count Auto Stock Take - Zonal ID PM942
This new feature does not affect the operation of the mobile stock solution.
Head Office Configuration
A new head office configuration is available per thread that determines if MAC stocks are to be used, i.e. mobile stock counts will trigger a stock.
MAC stocks cannot be selected (configuration is greyed out) for master threads:
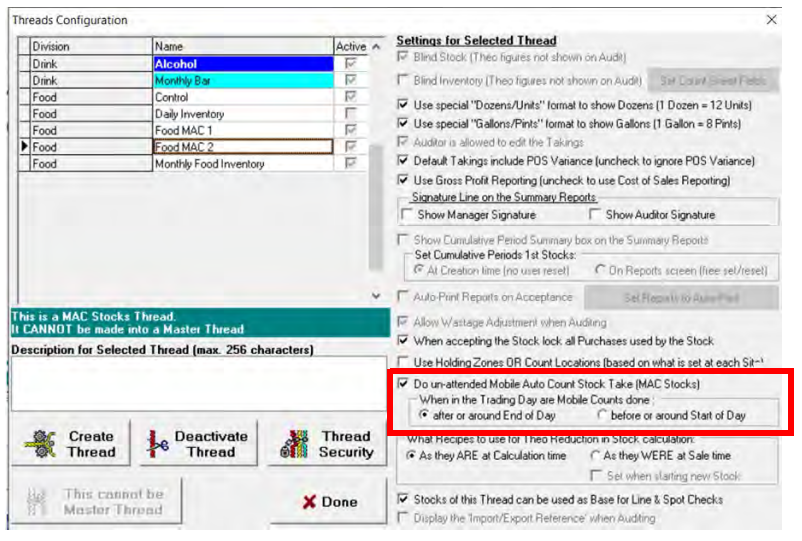
When the check-box is ticked a radio button group beneath it is enabled and allows the user to specify when in the trading day the Mobile Count Session is done for this Thread. This setting enables MAC stocks to follow two main different operational patterns: End of Trading Day (EoTD) and Start of Trading Day (SoTD). The choice of which method to use is based on when the stock taking staff find the best quiet time to do one or more Mobile Count Sessions. Late after a day’s trading is finished (or almost finished) so the counts are relevant for `today’s' sales or early before a day’s activity starts (or is just about to start) so the counts are relevant for `yesterday’s'sales.
Setting a thread up for MAC stocks does not allow that thread to be made into a Master Thread. Master threads already have this check-box disabled (greyed out) so it cannot be ticked.
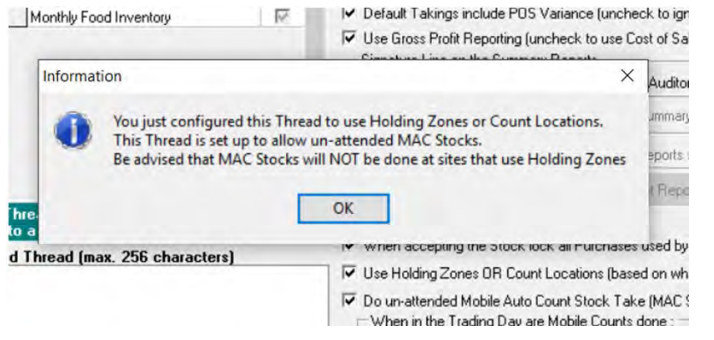
MAC stocks are also not allowed for stocks done by Holding Zone, but Holding Zones are site configuration dependant so the HO Thread setting does not control that. The user is allowed to tick both `Use Holding Zones OR Count Locations…' and `Do … MAC Stocks' check boxes. Therefore, a thread is allowed for MAC Stocks at sites that are set up to use Count Locations (and such Threads can of course have MAC stocks at Sites that use neither Holding Zones nor Count Locations).
When the user ticks one of the two check-boxes so that both are now checked, the system will present an information message:
Site Operations
The MAC stock taking at site is completely unattended and there is no user interface so there is no functionality to see as far as MAC stock taking is concerned.
Assuming the site PC has a way to start the Stock system in blind mode (i.e. using the parameter `blind') only the results can be seen. These results can be seen in the SSlog.log file or if the Stock system is opened in normal (interactive) mode afterwards.
The MAC stocks can be seen in the `Accepted Stocks' screen and their Reports can be viewed and printed as normal.
The system DOES NOT allow unaccepting of MAC stocks for normal use. Only Zonal users (for testing and support) are allowed to unaccept MAC stocks. If a MAC stock is unaccepted, it will be deleted.
No MAC stock will ever appear in the `Current Stocks' screen as they are automatically accepted just after calculation.
MAC Threads can be initialised and re-initialised in the `New Stock' screen.
By definition it is not possible for a user to start a new MAC stock in interactive mode.
A user can start a New Stock for the Thread set up to do MAC stocks in interactive mode but that stock is WILL NOT be a MAC stock. It will be subject to the normal, existing rules for Stocks (especially but not restricted to rules about minimum Stock periods). A MAC stock coming after such a `normal' stock will be triggered (or not) according to the MAC stock rules taking as its Start Date and Start Date Time, and the End Date and End Date Time of the previously made `normal' stock.
The system will always ensure perfect continuity of the Thread both with regards to purchases (by Business Date) and Sales Reduction (by Date/Time).
Once Head Office to Site comms have been done, the MAC stocks will be visible at Head Office. As far as the Head Office Stocks system is concerned, there is no difference in behaviour between MAC stocks and normal stocks.
MAC Stocks & Locations
If a Thread is enabled for MAC stocks and for Count Locations and the Site uses Count Locations, then the system will do a MAC stock by Location, otherwise it will do a MAC stock by Site.
A MAC stock done `by Site' will import only Site-wide Mobile Counts (so only those with Location ID 999).
A MAC stock done `by Location' will import Mobile Counts for all the Location IDs it finds (including 999).
The system simply adds up all the Counts per Product, regardless of Session, Location, Unit or Row, and the total Audit Count is recorded in Base Units (to be retrieved by the system in Purchase Units).
Unlike with normal interactive mode usage, the system takes whatever it finds in the Mobile Count Sessions to be `true' or 'correct' as regards the Location setup
In interactive mode, if a Product-Unit record is in the Mobile Count Session but not in the Location setup, it is not imported and not used. As there is no user for MAC stocks to notice and rectify such discrepancies, everything in the Count Session(s) is added up regardless of the Location Lists setup.
Money Belt Declaration Report (Expected Values) - Zonal ID PM944
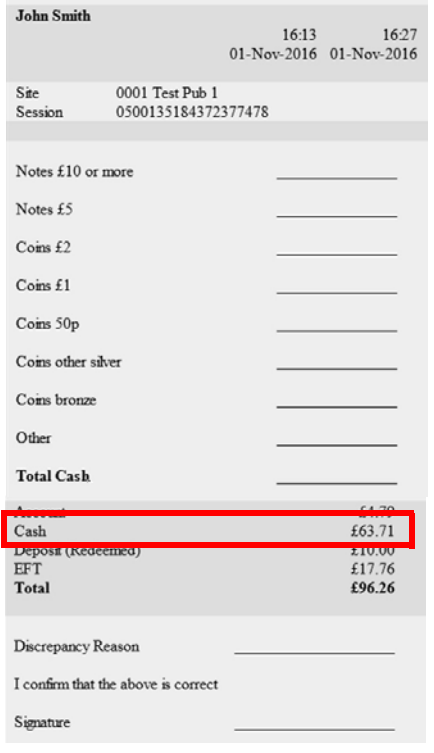
This report has been developed purely for the UK and will only ever use the £ currency symbol. The layout of the report is exactly as described below and other non-standard/non-UK currency denominations defined in your system, will not appear in this report
Head Office Configuration
The Money Belt Declarations report can be configured at head office to be printed automatically when a money belt session is ended at site. It can be enabled from either Aztec Base Data or Aztec Finance:
-
Aztec Base Data| Estate Structure | Site Settings
-
Aztec Finance| Configuration | Estate Settings | Site Settings
Like all settings available within the Estate Structure tree it is possible to apply this setting to a group of sites simultaneously by multi-selecting the sites in the tree view before changing the setting.
New Standard Reports - Zonal ID PM946
Two new standard reports (Discount Summary report and Void report) and changes to the Discount report have been introduced in this version.
Added Support for Tax Rule Substitutions - Zonal ID PM950
An example product set up in Ireland could be:
-
Jack Daniels - Tax Band 1 – 15%
-
Chips - Tax Band 2 – 20%
-
Steak - Tax Band 2 – 20%
However, for a company's UK sites, all three products would have a single 'VAT' tax rate of 20% instead.
This enhancement enables the substitution of one or more country tax rules configured for a product for another general tax rule and this is carried out on a site by site basis. In the example above, we would be able to substitute both Tax Band 1 and Tax Band 2 for 'VAT' on all UK Sites and leave them as country specific for the sites that use these other tax bands.
This feature can only be implemented and managed by Zonal, for more information contact your Zonal Account Representative
Restrict Orderline Corrections when Payment on Account - Zonal ID PM960
on the account (incorrectly giving the customer more money than they originally paid). Corrections per orderline can also be refunded to any payment method
(not just the original card used).
This new feature enables payment methods to be configured to define whether or not orderlines can be corrected when a payment of that type is on the account, so that the payment must be reversed before any orderlines can be corrected.
Head Office Configuration
-
Open Aztec Finance | Configuration | Payment Methods
-
Select as required the check box for 'Restrict Orderline Corrections'(unchecked by default)
If configured on, an POS account with a payment of this type must have the payment line corrected before any orderlines on that account (which were rung up before the payment) can be corrected.
As per previous behaviour, any orderline rung up after the payment can still be corrected, for example, a discount is applied to an account.
It is still possible for a user to remove a service charge from an account even if a payment (which restricts whether orderlines can be corrected) has been applied to the account. Normal POS behaviour is that a service charge can be removed from an account after a payment has been made and this is not affected by this release.
Retain POS Event Logs - Zonal ID RD147
To enable the support of POS issues. EPoS terminal event logs are now read to the back office by default.
Windows 10 Support - Zonal ID RD151
Aztec is now supported on Windows 10 OS.
'New Site' Reconfigure Type - Zonal ID RD166
The roll-out of new sites with no transactional history, has been speeded up with the introduction of a new reconfigure type (for use by users with the necessary privileges).
Aztec Base Data Integration with ZCF HO proxy - Zonal ID RD170
To ease installation and support of systems that use the ZCF proxy, new fields have been added to enable set up and test of proxy connections.
Do Not Show Comms Errors for Plugins Not Used by Site - Zonal ID RD171
To reduce comms jobs errors concerning plugins, site plugins can now defined for inclusion / exclusion from the comms job.